The Definitive 10 Step Guide On How To Start Your Nitro RC Car
There are many guides out there that explain how to start a nitro
RC car but many beginners can still struggle as the guides assume that
you already have a little knowledge or do not go into enough detail.
So if you are pulling your hair out and just can’t get it going then
don’t fret, if you follow this guide from start to finish and don’t miss
a single step then you will get it going.
IMPORTANT – Before We Start..
- Do not skip a single step. Some things may not seem important but actually if not done then it will stop the engine starting. Take your time and make sure you follow every step carefully.
- If the engine is very cold it is going to make starting it a little bit more difficult. If it is the middle of winter and you are outside trying to start a brand new engine in the cold for the first time you are not going to have a nice time. Instead, make yourself a nice hot drink, take it somewhere warm and take your time. Of course you should not run a nitro engine indoors as they give off fumes when started but for pre-starting setup do it somewhere warm and if you do start the engine you can just turn it off again straight away.
- It’s useful to have a basic understanding of how the engine works so that the instructions make more sense. The engine sucks up fuel from the fuel tank and air through the air filter. Inside the engine the fuel is mixed with the air and compressed against a glowing coil (glow plug) which ignites the fuel and air mixture causing an explosion. This explosion forces the piston down which turns the engine and also sucks up the air and fuel for the next explosion. The important bit to remember is that the more air in the mixture the bigger the explosion will be. So when you apply throttle it opens up the air flow so more air can get into the engine making the explosions bigger and therefore making the engine go quicker. So if you have an air leak more air will get into the engine making it accelerate on its own and almost impossible to start.
STEP 1 – Get The Right Tools Ready..
You are going to need these tools:
- A glow plug wrench. (Included in your starter set.)
- A small flat screwdriver. (Included in your starter set)
- A small Phillips screwdriver. (Included in your starter set)
- A normal Phillips screwdriver. These are in most toolkits.
- A 1.5mm hardened tipped hex wrench. Avoid using the little L shaped
ones or cheap ones as they use soft metal that will wear immediately and
then strip your grub screws. Invest in a proper hobby grade one if you
don’t have one already.
- A 2.5mm (depending on engine size) hex wrench.
STEP 2 – Tighten Your Screws..
Nitro cars use metal screws and bolts that screw into metal parts. As metal warms and cools it expands and contracts which can loosen them. Most nitro cars are made in warm countries and then shipped to the cold UK so the metal contracts and loosens. It must be completely air tight between the engine, manifold and exhaust. If there is an air leak it will make the engine extremely difficult to start and will make it rev on it’s own as it’s the equivalent of opening the throttle.
When tightening the screws you should only tighten until you feel it
pinch. If you over-tighten you are going to break the screw or thread.
Under-tighten and you will get air leaks or the engine will move and
break the gears. So just tighten until it pinches.
These are the screws that you particularly need to make sure are tight:
- The screws that hold the manifold to the engine. This is the biggest culprit for air leaks.
- The screws that hold the engine in place. This is the biggest culprit for stripping your spur gear.
- The engine head screws. Please be very careful to use a proper
hardened tipped hex driver to check these so that you do not strip the
screw heads. Also be very careful not to over-tighten, just a small
pinch. If you over tighten these and it strips the screw thread you will
have to replace the engine block which is not so easy for a beginner.
STEP 3 – Adjust Your Idle Screw..
As explained earlier the more air you let into the engine the faster it will go because more air means more oxygen which gives a bigger explosion. So when you pull the throttle what happens is that the hole in the carb (the bit the air filter is attached to) gets bigger to allow more air in. And when you let go of the throttle the hole closes again so less oxygen can get in, so the explosions are smaller.
- Make sure your radio handset is turned off and that the electronics on the car are also turned off.
- Take your air filter off so you can see the carb hole. So you can
see how it works gently turn the throttle servo by hand. You will see
that the carb hole opens and closes as you rotate the throttle servo
clockwise and anti-clockwise.
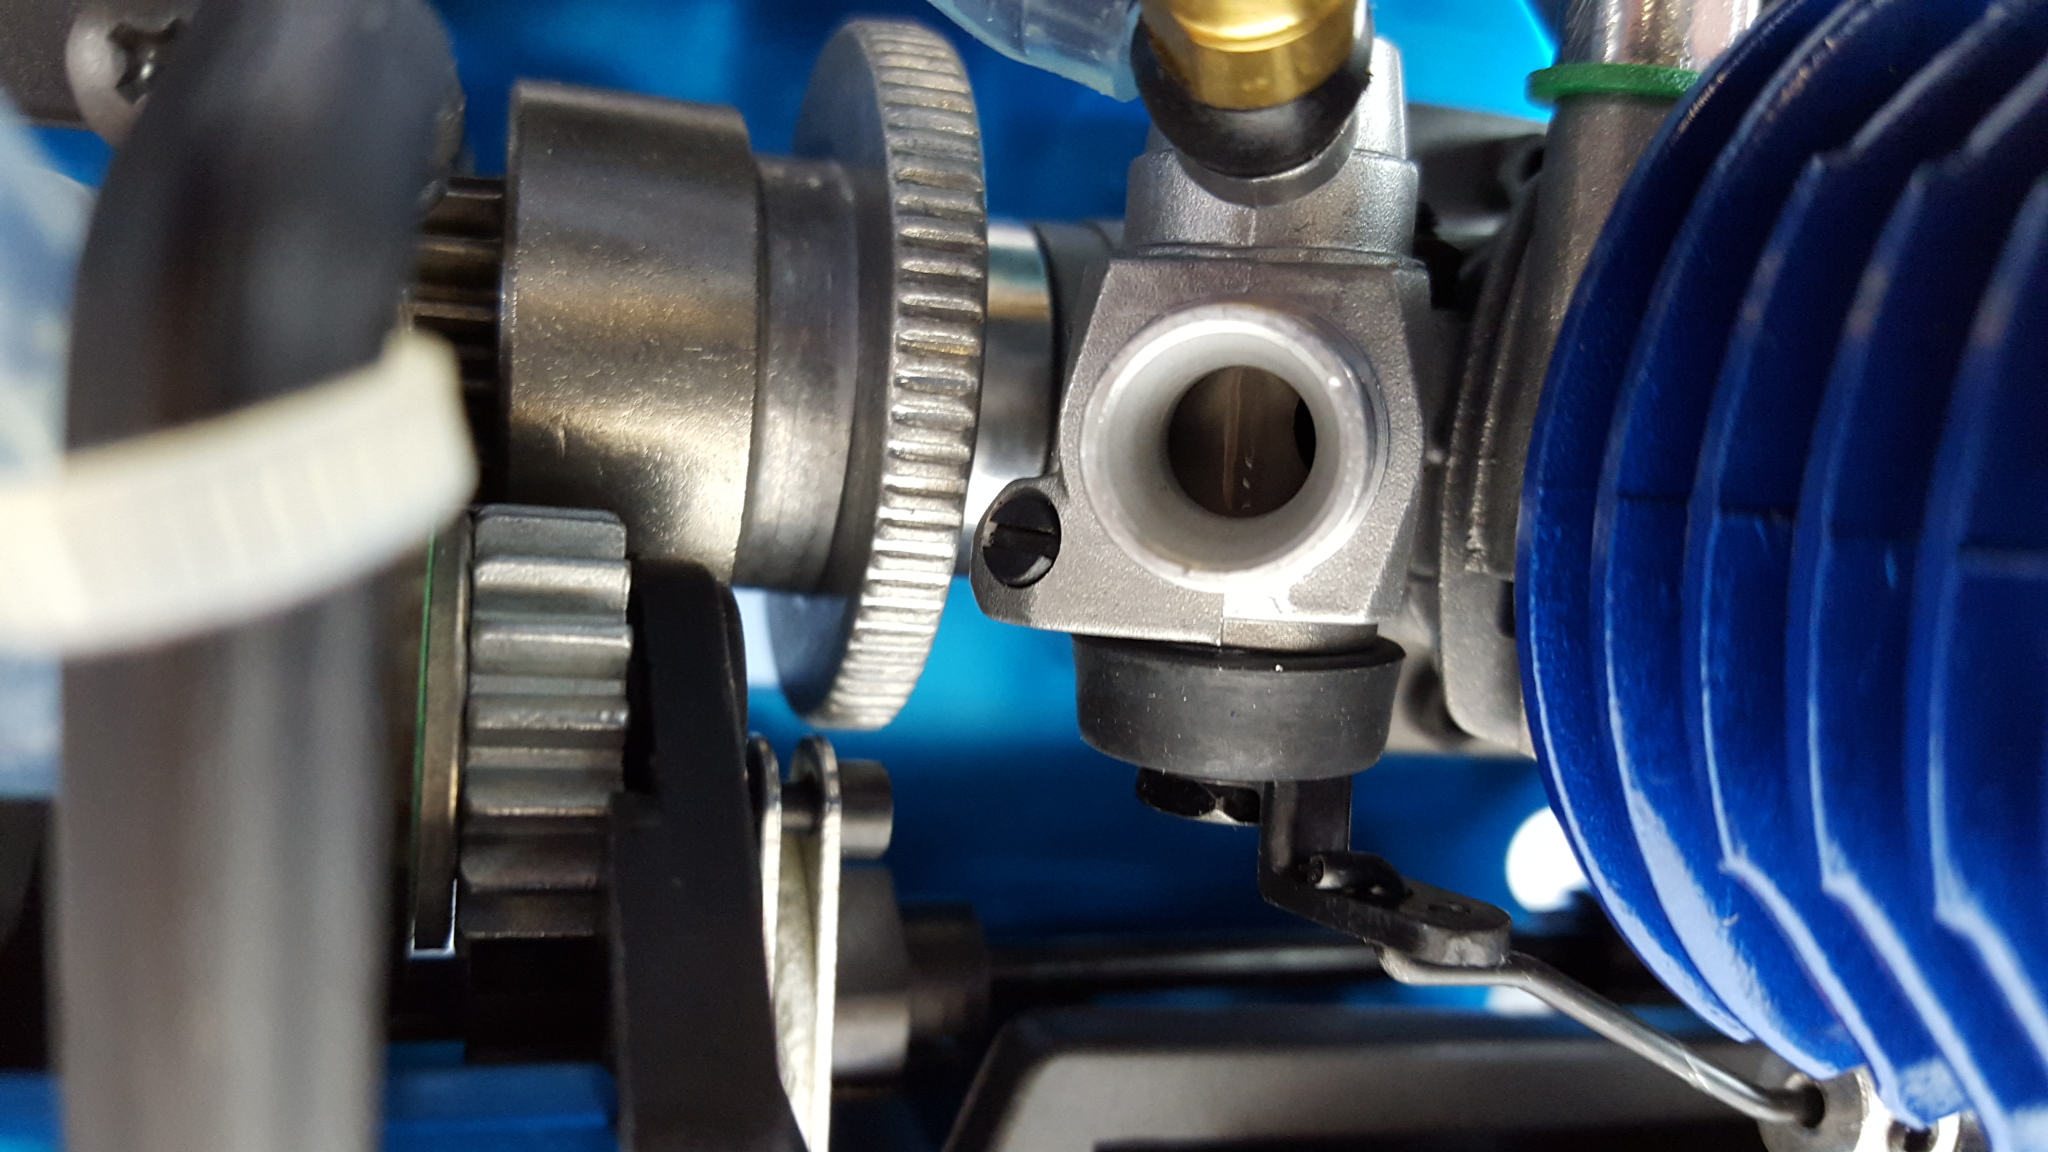
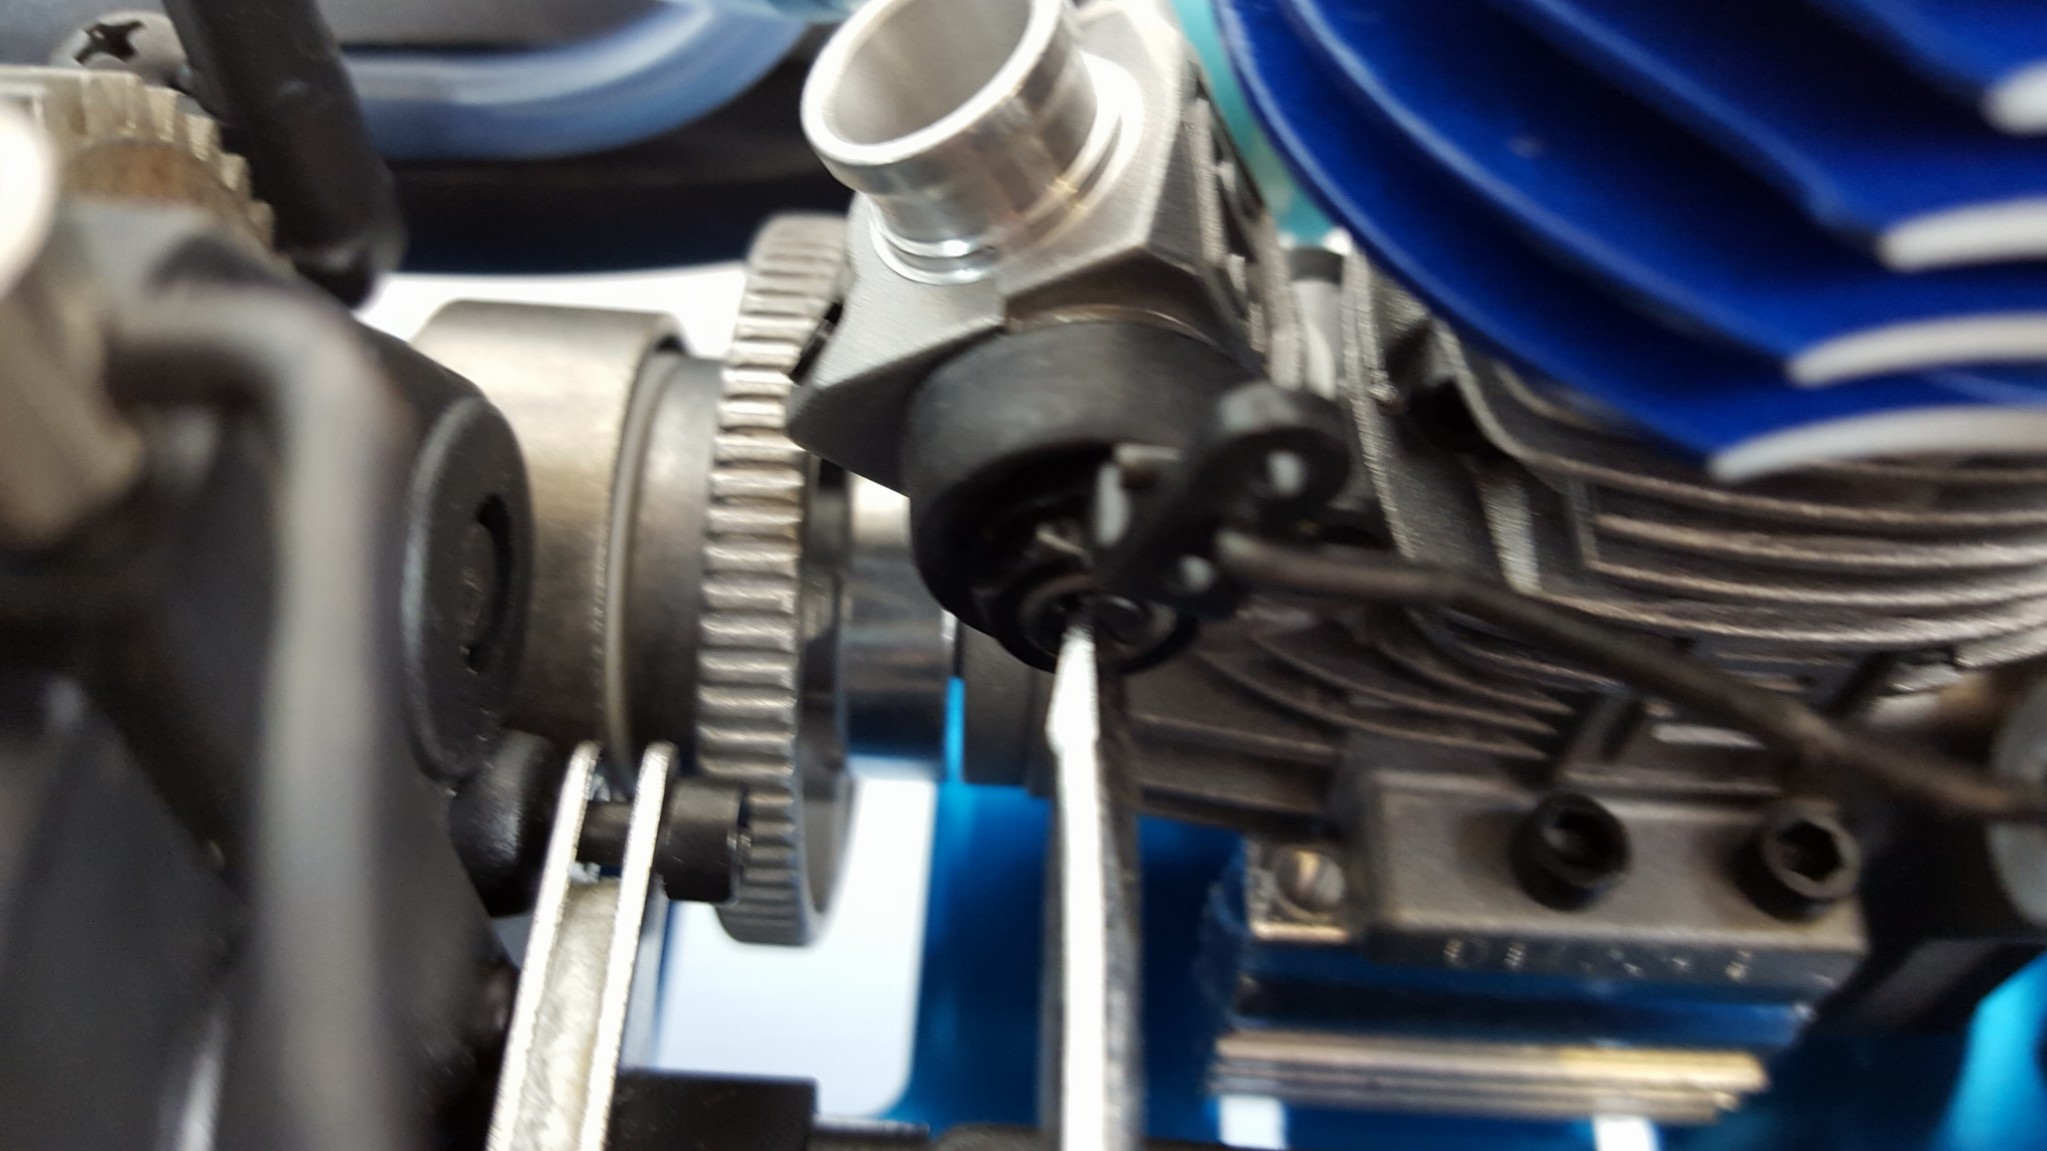
Throttle Closed Throttle Open The idle screw controls how closed this hole can go. If when you released the throttle the hole closes completely then there would be no air going into the engine at all and it would just cut out as fuel can’t ignite without oxygen.
- Open the hole a little by rotating the throttle servo and then
rotate it the other way to close the hole again as much as it will
close. When you have closed it as much as possible you want the hole to
be still around 1.5mm open as shown in the picture below.
When throttle is closed the hole is only 1-2mm open. - If your hole is open more than this then open the hole again by
rotating the throttle servo and then turn this screw a little
anti-clockwise.
This is the idle screw - Now close the hole again as much as it will close. You will see now that after this adjustment the hole will be able to close more than it could before.
- If on the other hand the hole was to small you do the same thing but turn the screw clockwise a little. So open the hole first, turn the screw clockwise and then try to close again and you will see now the hole can close less than before. So just keep opening the hole and turning the screw clockwise and anti-clockwise as needed and then closing the hole again until the minimum hole size is the same as the picture above.
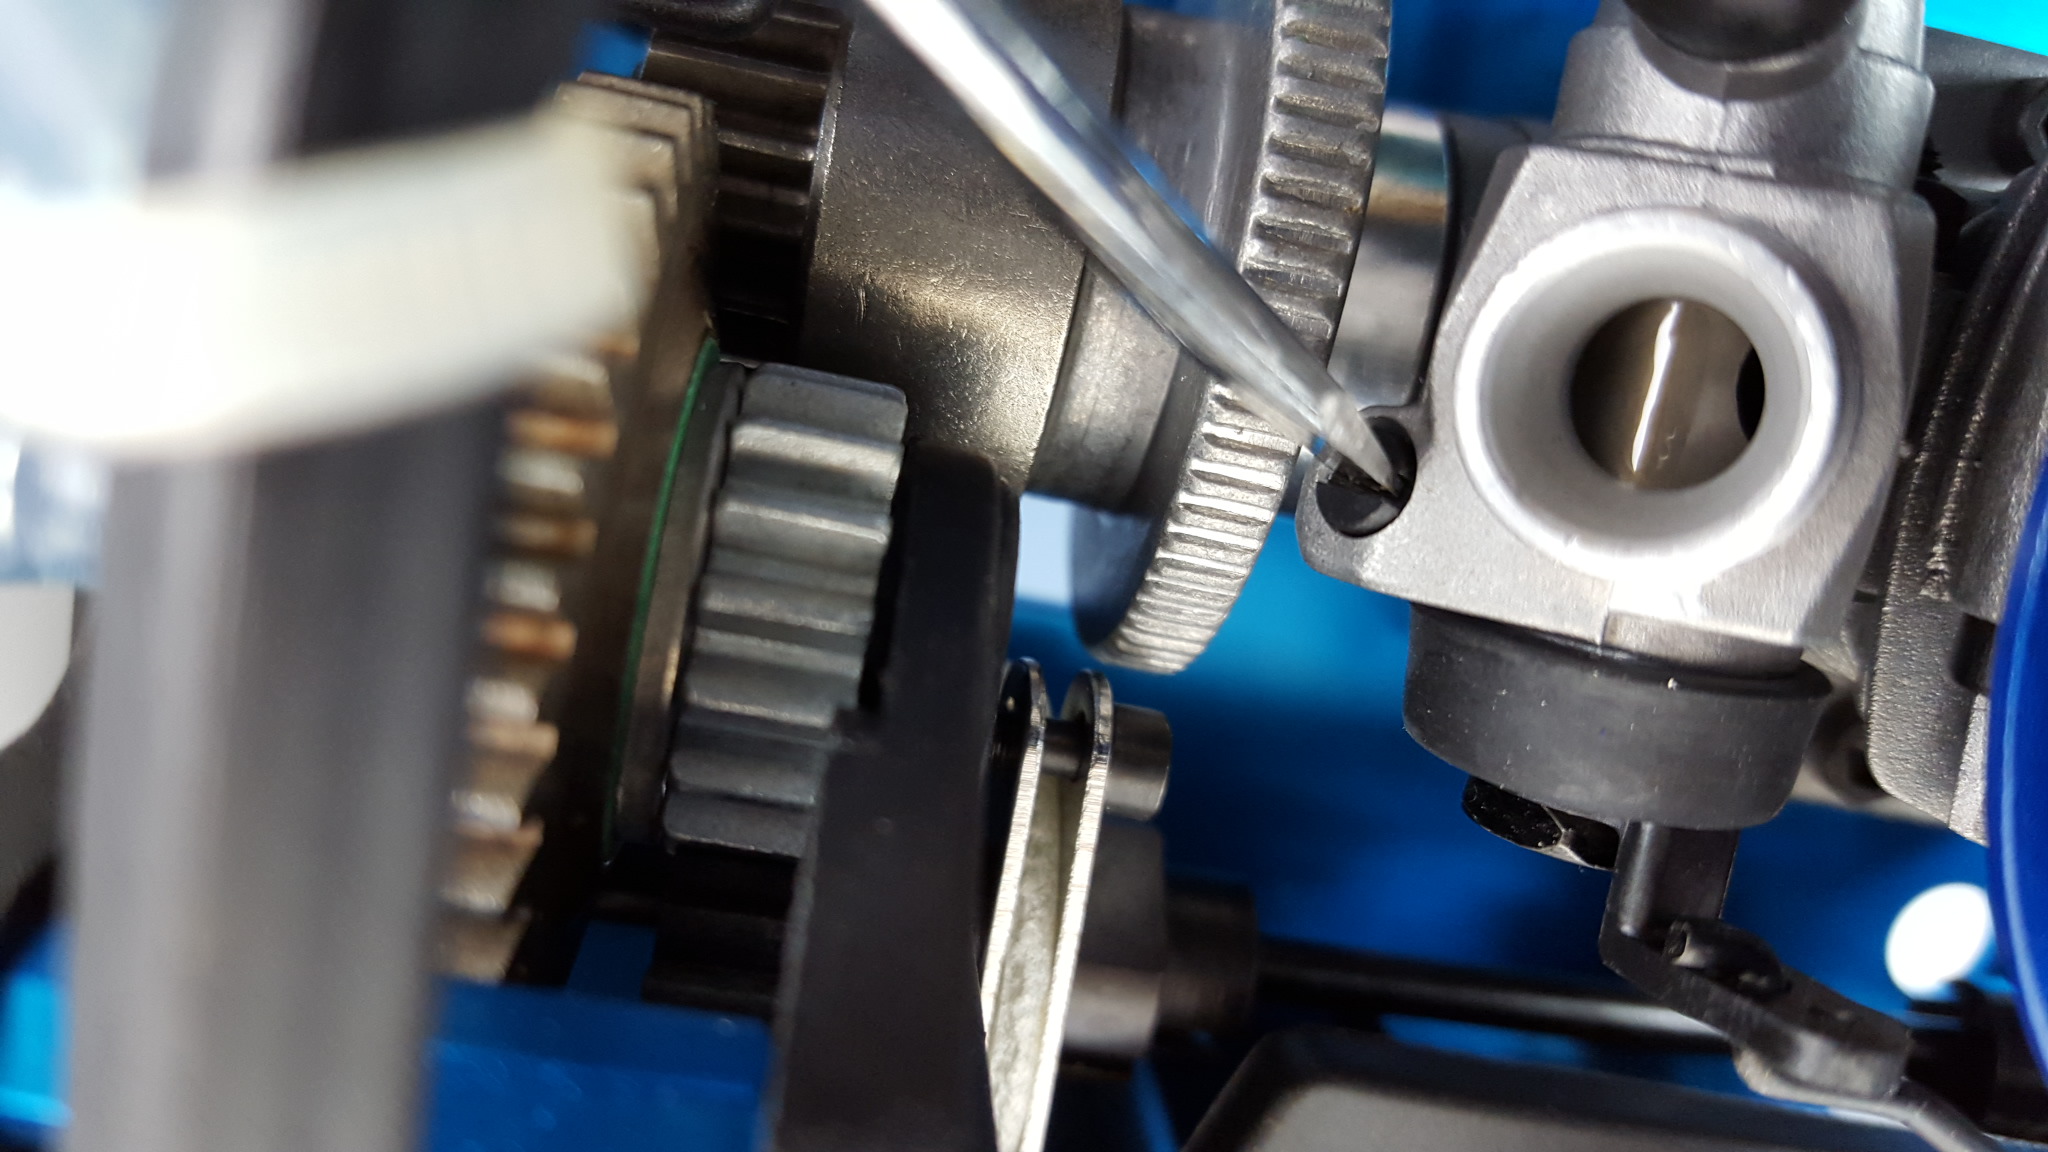
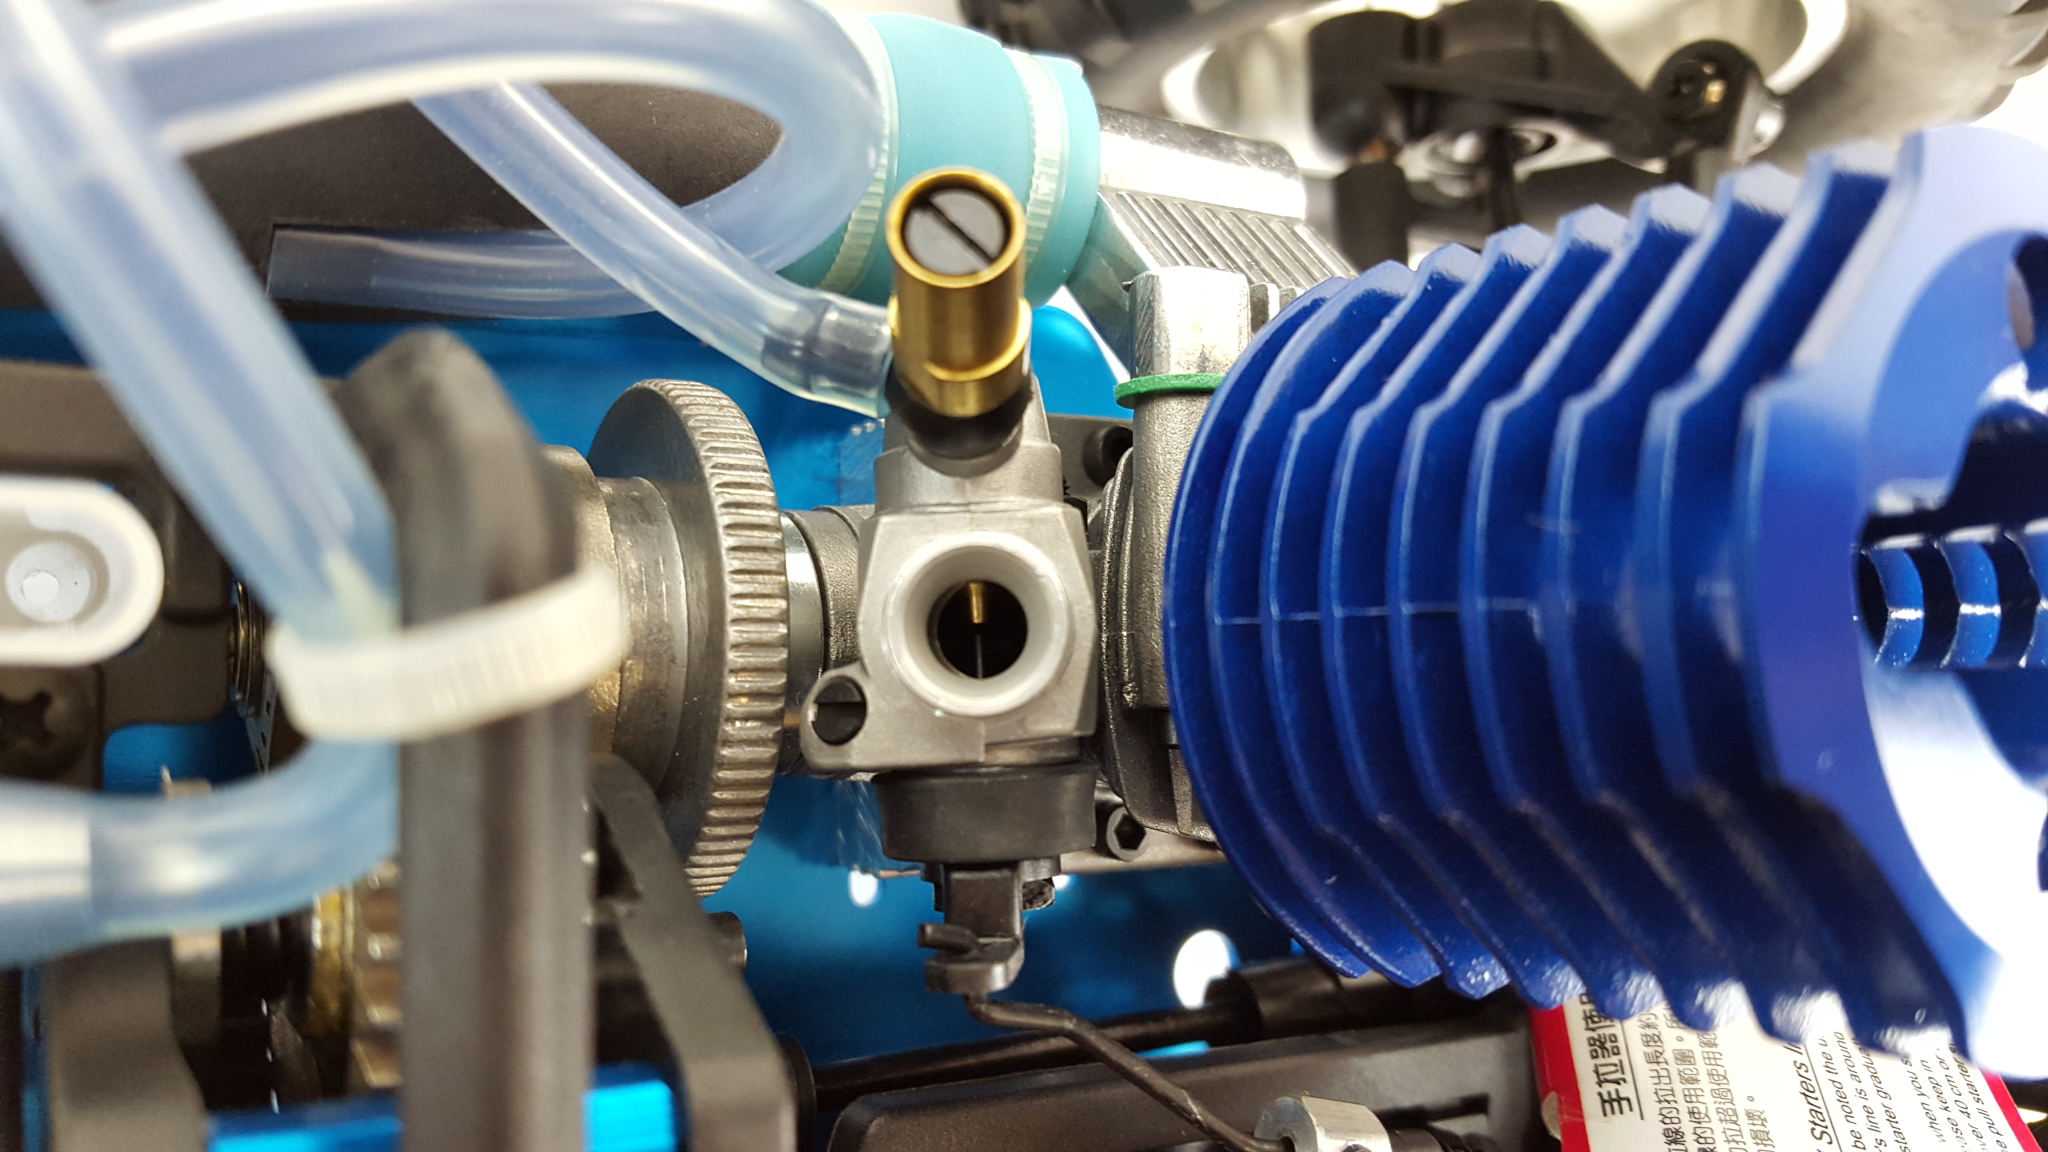
STEP 4 – Adjust Your High Speed (Main) Needle
This is your high speed needle or main needle:
As discussed the engine is sucking in fuel and air and mixing it in the engine and igniting it. We have now set the idle screw in step 3 which controlled how much air is sucked into the engine when the throttle is not applied. Now it’s the turn of the high speed needle which controls how much fuel can be sucked into the engine.
If you turn this screw clockwise then it closes the hole that the
fuel flows through so less fuel can get into the engine and
anti-clockwise will open the hole allowing more fuel into the engine. If
you turn it to much clockwise then there will be barely any fuel
getting into the engine. This will do two things. Firstly it will make
the engine dry which will burn and break it. And secondly the ratio of
air to fuel will be higher which will cause bigger explosions making the
car go fast even when you are not applying the throttle. On the other
hand, if you turn it to much anti-clockwise then to much fuel is going
to get into the engine. This will make the engine fill up with liquid
and when you start the engine it will start spitting the excess fuel out
of the exhaust causing a mess. If you fill the engine up with so much
fuel that it is totally full then the pull start will become very
difficult to pull and will probably break if you force it. If you pull
the pull start and it becomes difficult to pull and it’s jolting the
model then stop immediately and un-flood the engine as explained later
in this guide.
So how to set this screw just right? I’ve read many guides saying to
turn it a certain number of turns from fully closed but personally I
would say forget that. If you try closing the screw you will see that
there is not a clear fully closed point. The screw gradually gets
tighter and tighter and if you did actually close it 100% you would
probably end up threading and breaking it. Instead just set it so that
the top of screw head is around 2mm below the surround like in the
picture below.
This should give a good starting point and allow you to start the engine. Once we start the engine later in this guide then if you find it is spitting lots of fuel out of the exhaust then you can turn it a little clockwise just a quarter of a rotation and continue doing that every minute or so until there is only the very odd drip coming out.
STEP 5 – Adjust (Or Don’t Adjust!) Your Low Speed Needle
This is the low speed needle:
This would have been pre-set correctly at the factory and hopefully you have not adjusted it. If you have definitely not touched this screw then great, just move onto the next step and leave it as it is.
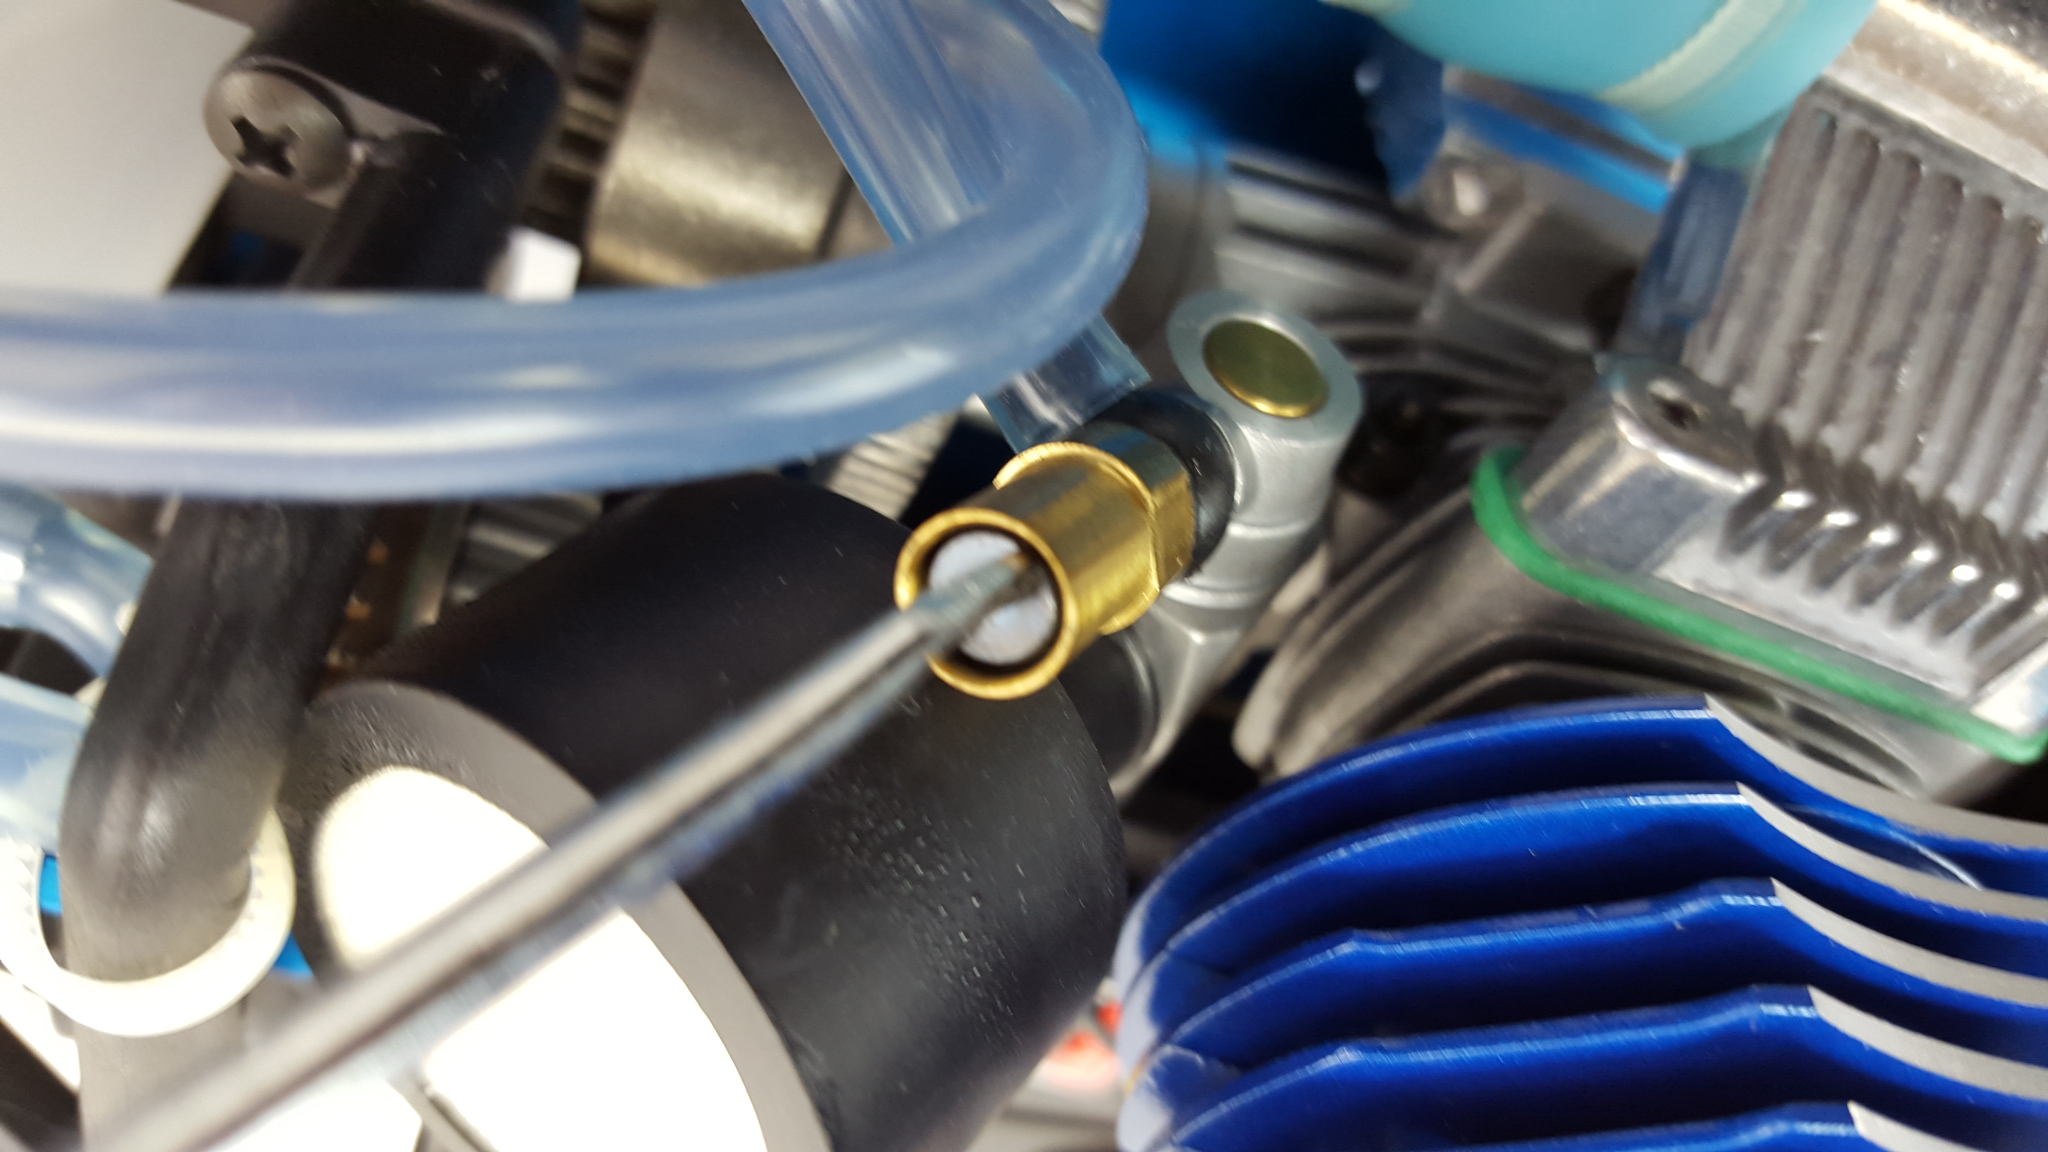
If you have adjusted it then you need to set it back. To explain what this needle does.. Imagine the fuel line coming into the engine is like a hosepipe. Now imagine you got a hosepipe and stuck the end of your little finger into it while it was on. The water would still flow out of it around your finger but your finger would be slowing the flow down. Whether your finger was 5cm or 4cm inserted would not really make that much difference. It would not make that much difference until your finger was say 1cm inserted and then when it is not inserted at all the hose pipe would be fully flowing without obstruction. The needle is basically your finger in this analogy. Turning the screw clockwise pushes the needle further into the tube and vice versa. When you apply throttle the needle is pulled out of the tube. At almost full throttle you want just the very tip of the needle to be inserted into the tube. So to set it, take the air filter out and open the throttle hole fully. Look into the carb and on one side you will see a tiny tube and on the other side (the side with the screw) you will see a tiny needle. Making sure the throttle is fully open, undo the screw a little so you can see the tip of the needle in the carb, and then just tighten it up so it is 1mm from touching the tube opposite.
STEP 6 – Adjust Your Radio Gear And Throttle Servo Horn
This step is not strictly needed but it’s something I always do as I like to have the servo horn at a 90 degree angle when in the neutral position so that just by looking at the servo horn you know how open the throttle is.
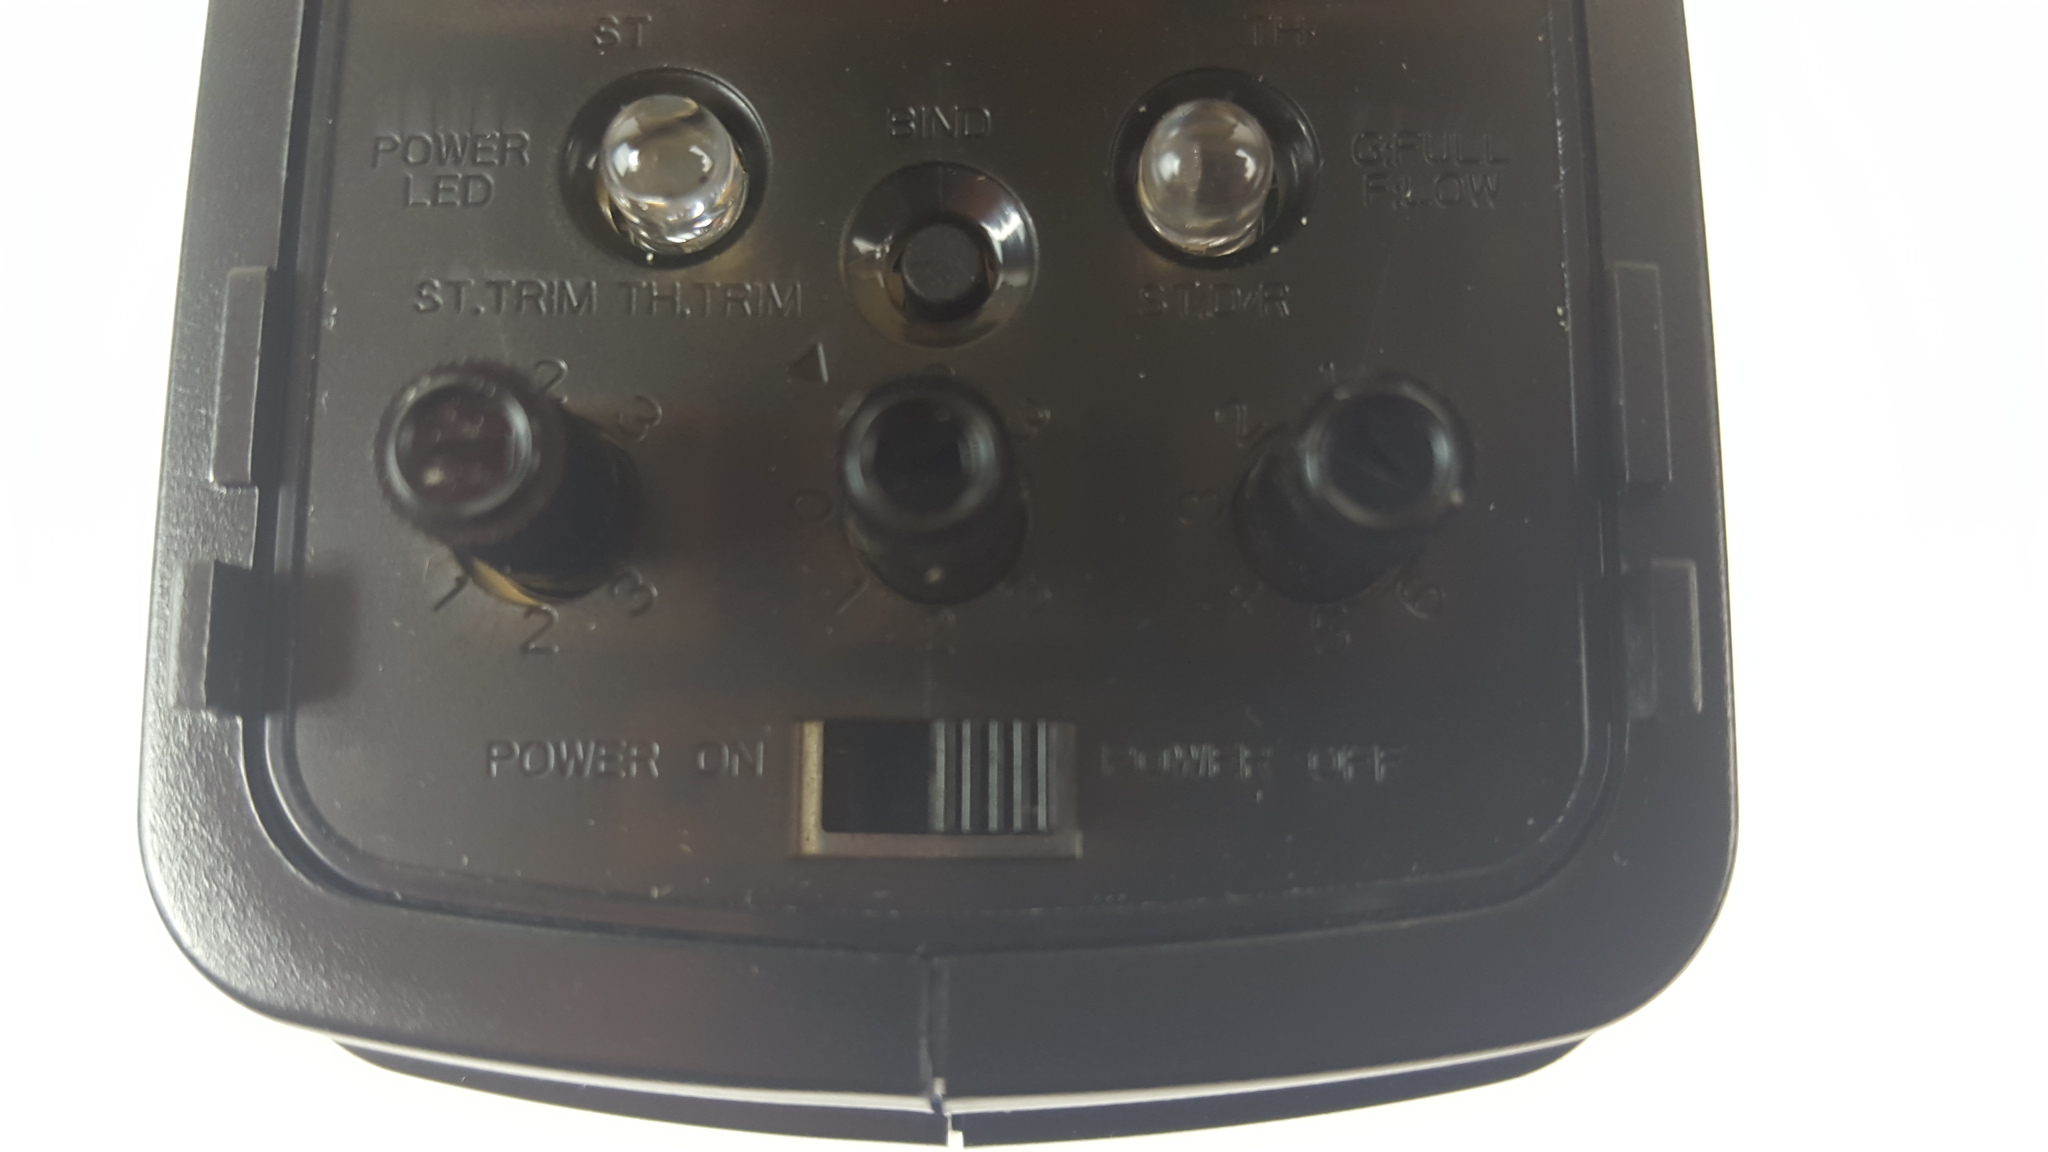
- Make sure you have your batteries in the car and radio. Turn on the switch on the radio and the switch on the car.
Electrics on/off switch Just pull the throttle a couple of times. Leave the air filter out so you can see when you pull the throttle the air hole opens and then closes when you let go of the throttle. (If the opposite happens and when you pull the throttle trigger it actually closes the hole and when you push it forward it opens the hole then flip the switch on the transmitter labelled something like “TH REV” to correct it.)
Throttle reverse switch - On your transmitter you should have a dial called something like “TH Trim”.
Throttle Trim Adjust this dial so that your throttle servo horn (the plastic bit on top of the servo that rotates when you pull the trigger) is at a 90 degree angle like in the image below. If adjusting the dial is not enough to make it straight like this then just undo the screw holding the servo horn down, pull the servo horn off, and then just put it back on at the correct angle.
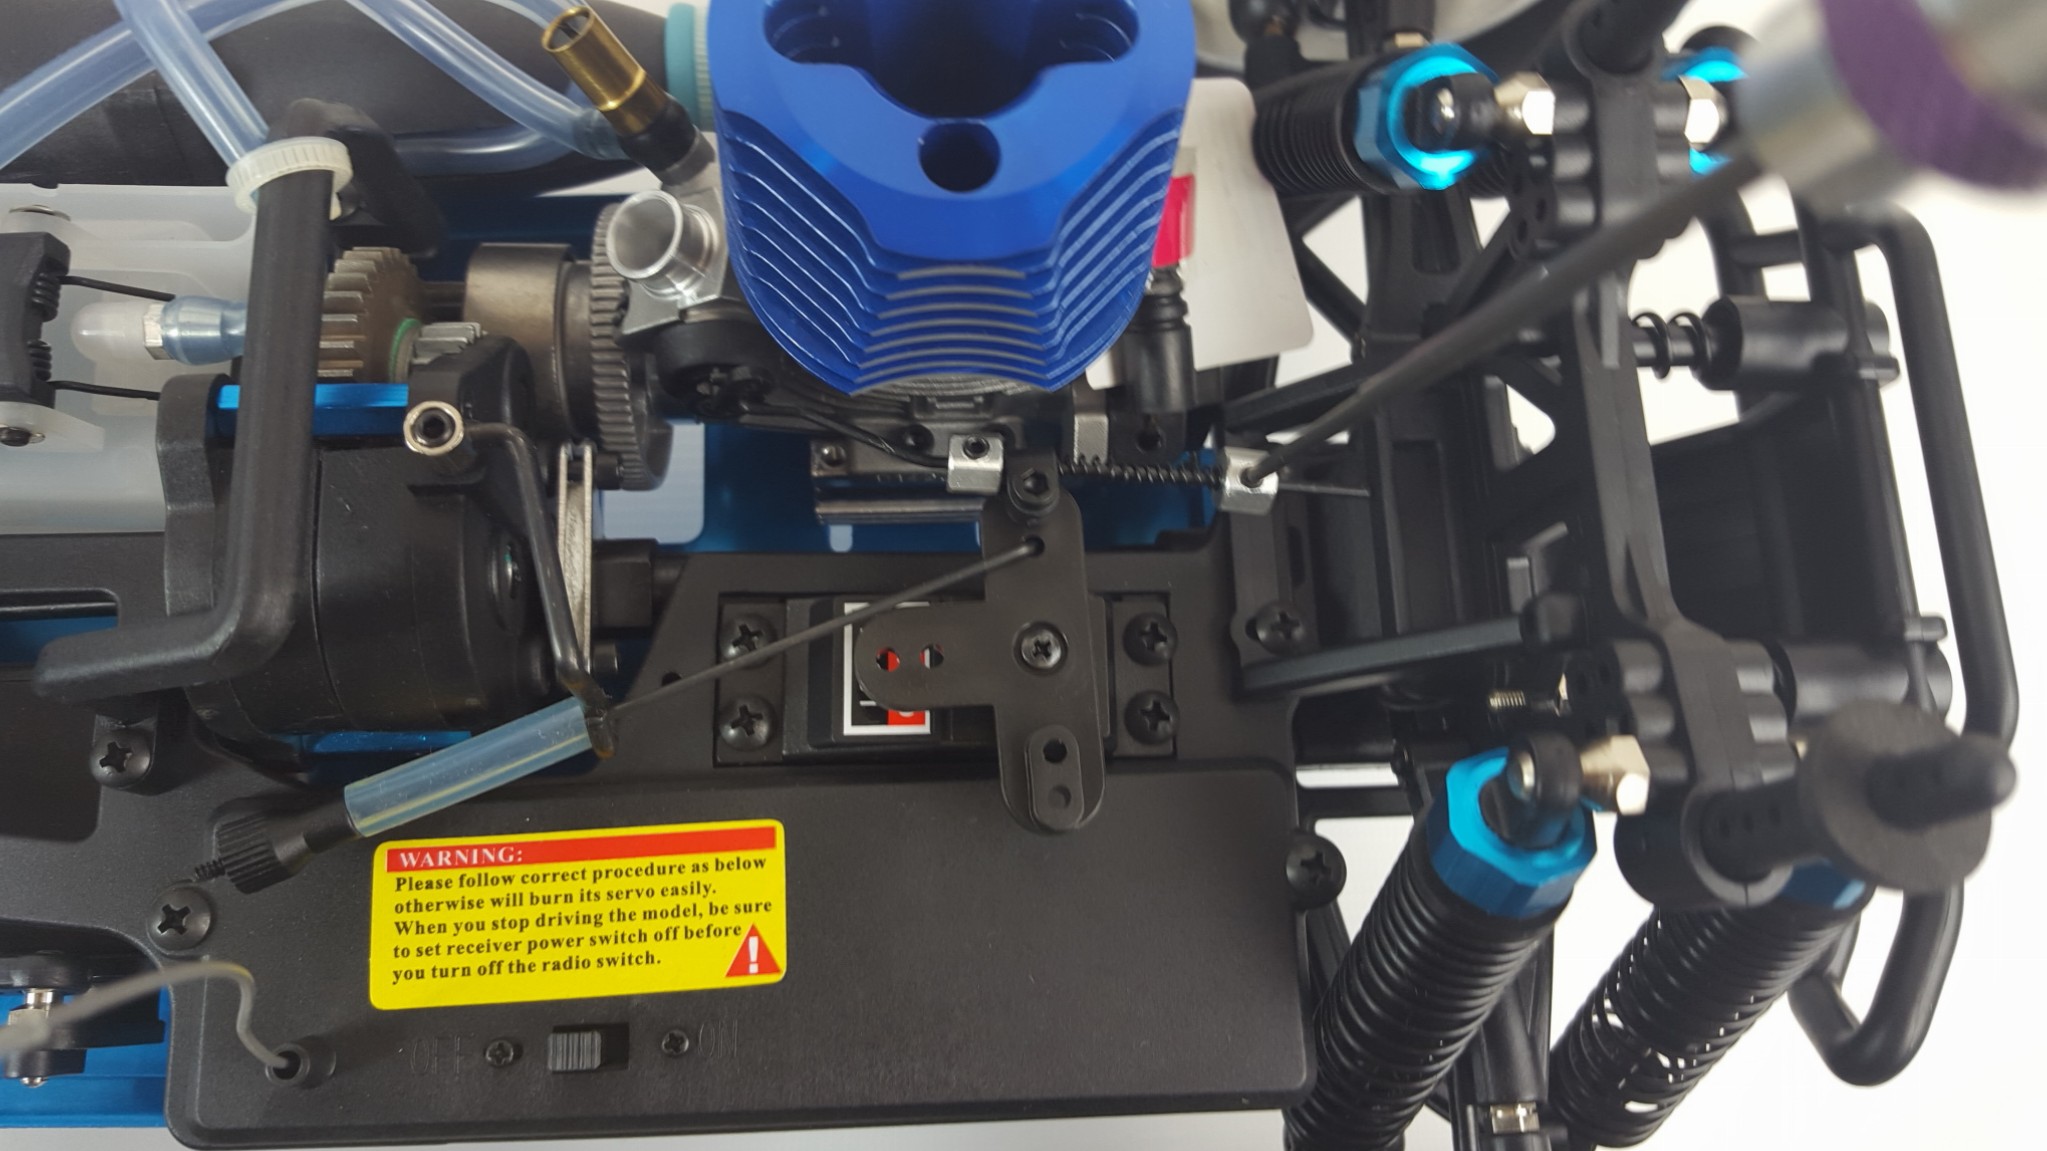
Throttle servo horn is at 90 degreen angle when in neutral position - Now using your hard tipped 1.5mm hex wrench loosen this stopper:
Adjust this stopper so it touches the servo horn. - With your finger push the little throttle lever on the engine all the way closed as much as possible. With it in that position slide the stopper so it is resting against the servo horn and tighten it up again.
- If you need to, undo the other little stopper that holds the spring
on and slide it to a point when the spring is a little compressed and
then tighten it again.
This stopper holds the spring on and can be adjusted if the spring is loose. - Roll the model along the ground a little and it should be able to roll freely. Now push forward on the radio trigger and the brake should come on and you should no longer be able to roll the model. If it is not like this then also undo the little stopper that is on the brake lever and slide it to the position that would make it do this and tighten again, or, if your model has a dial on the brake lever instead like in the picture above just adjust the dial.
- Once you have done that turn the switch on the car and the radio off. You do not need the radio equipment on while starting the engine so no point draining the batteries.
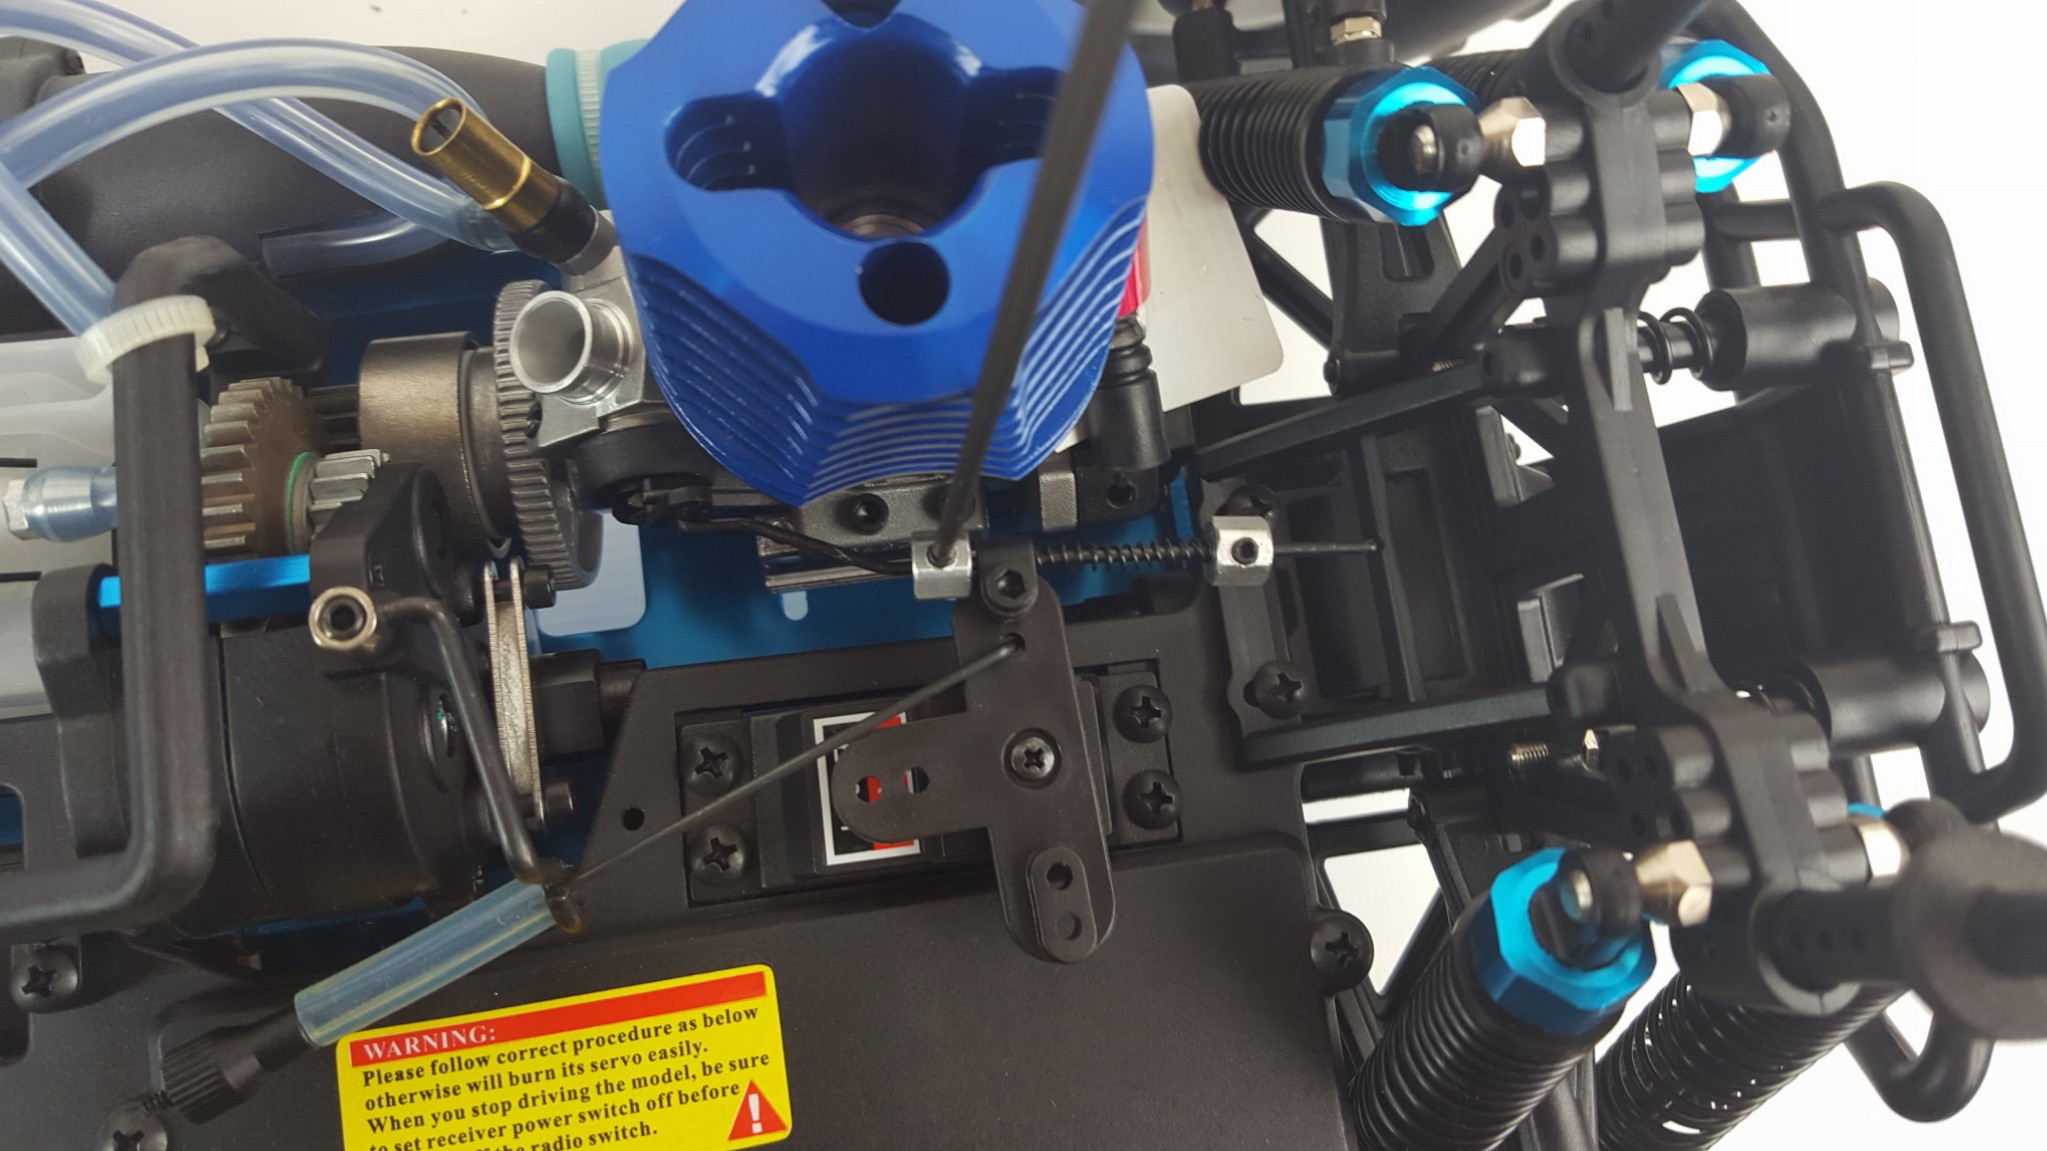
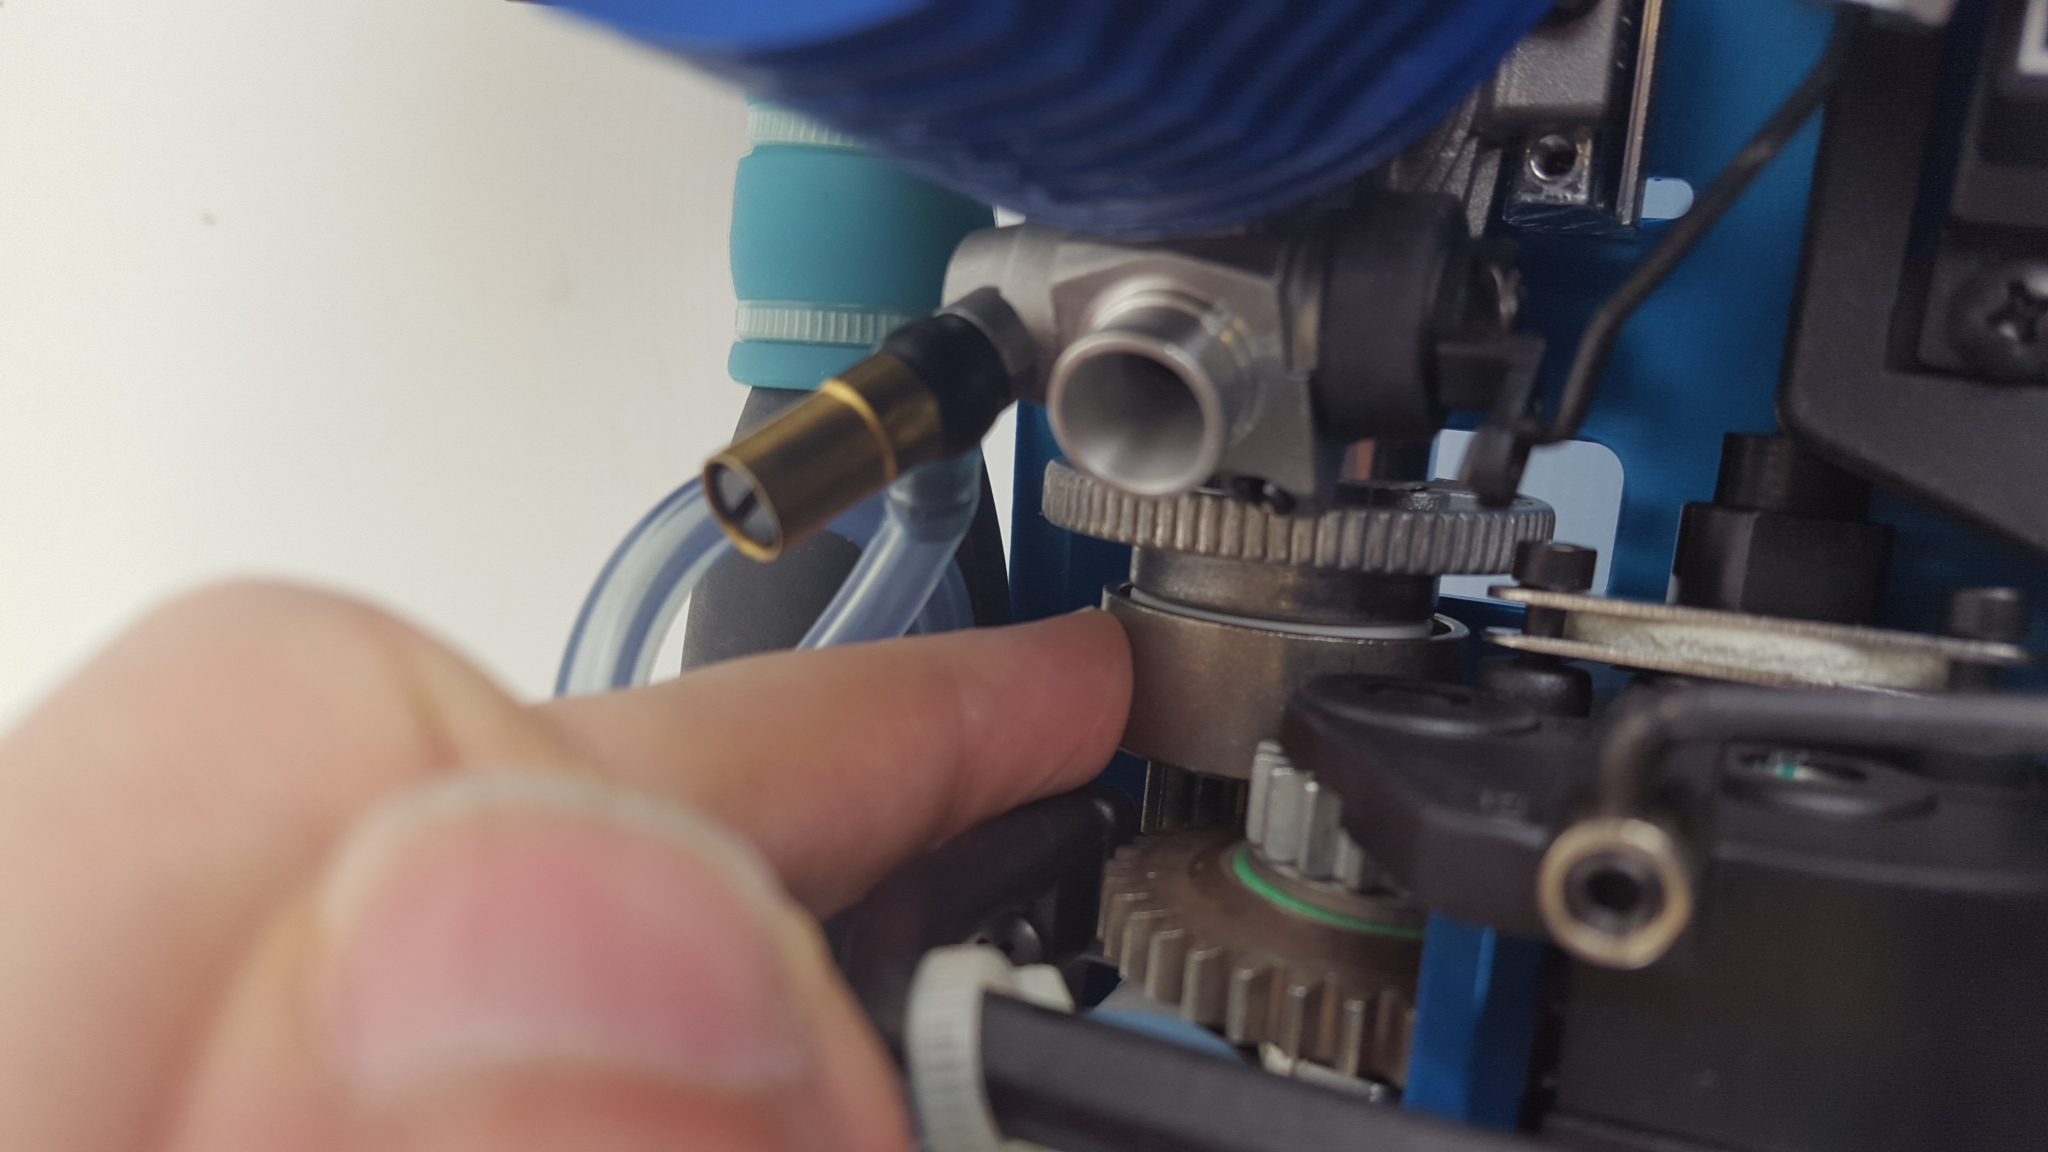
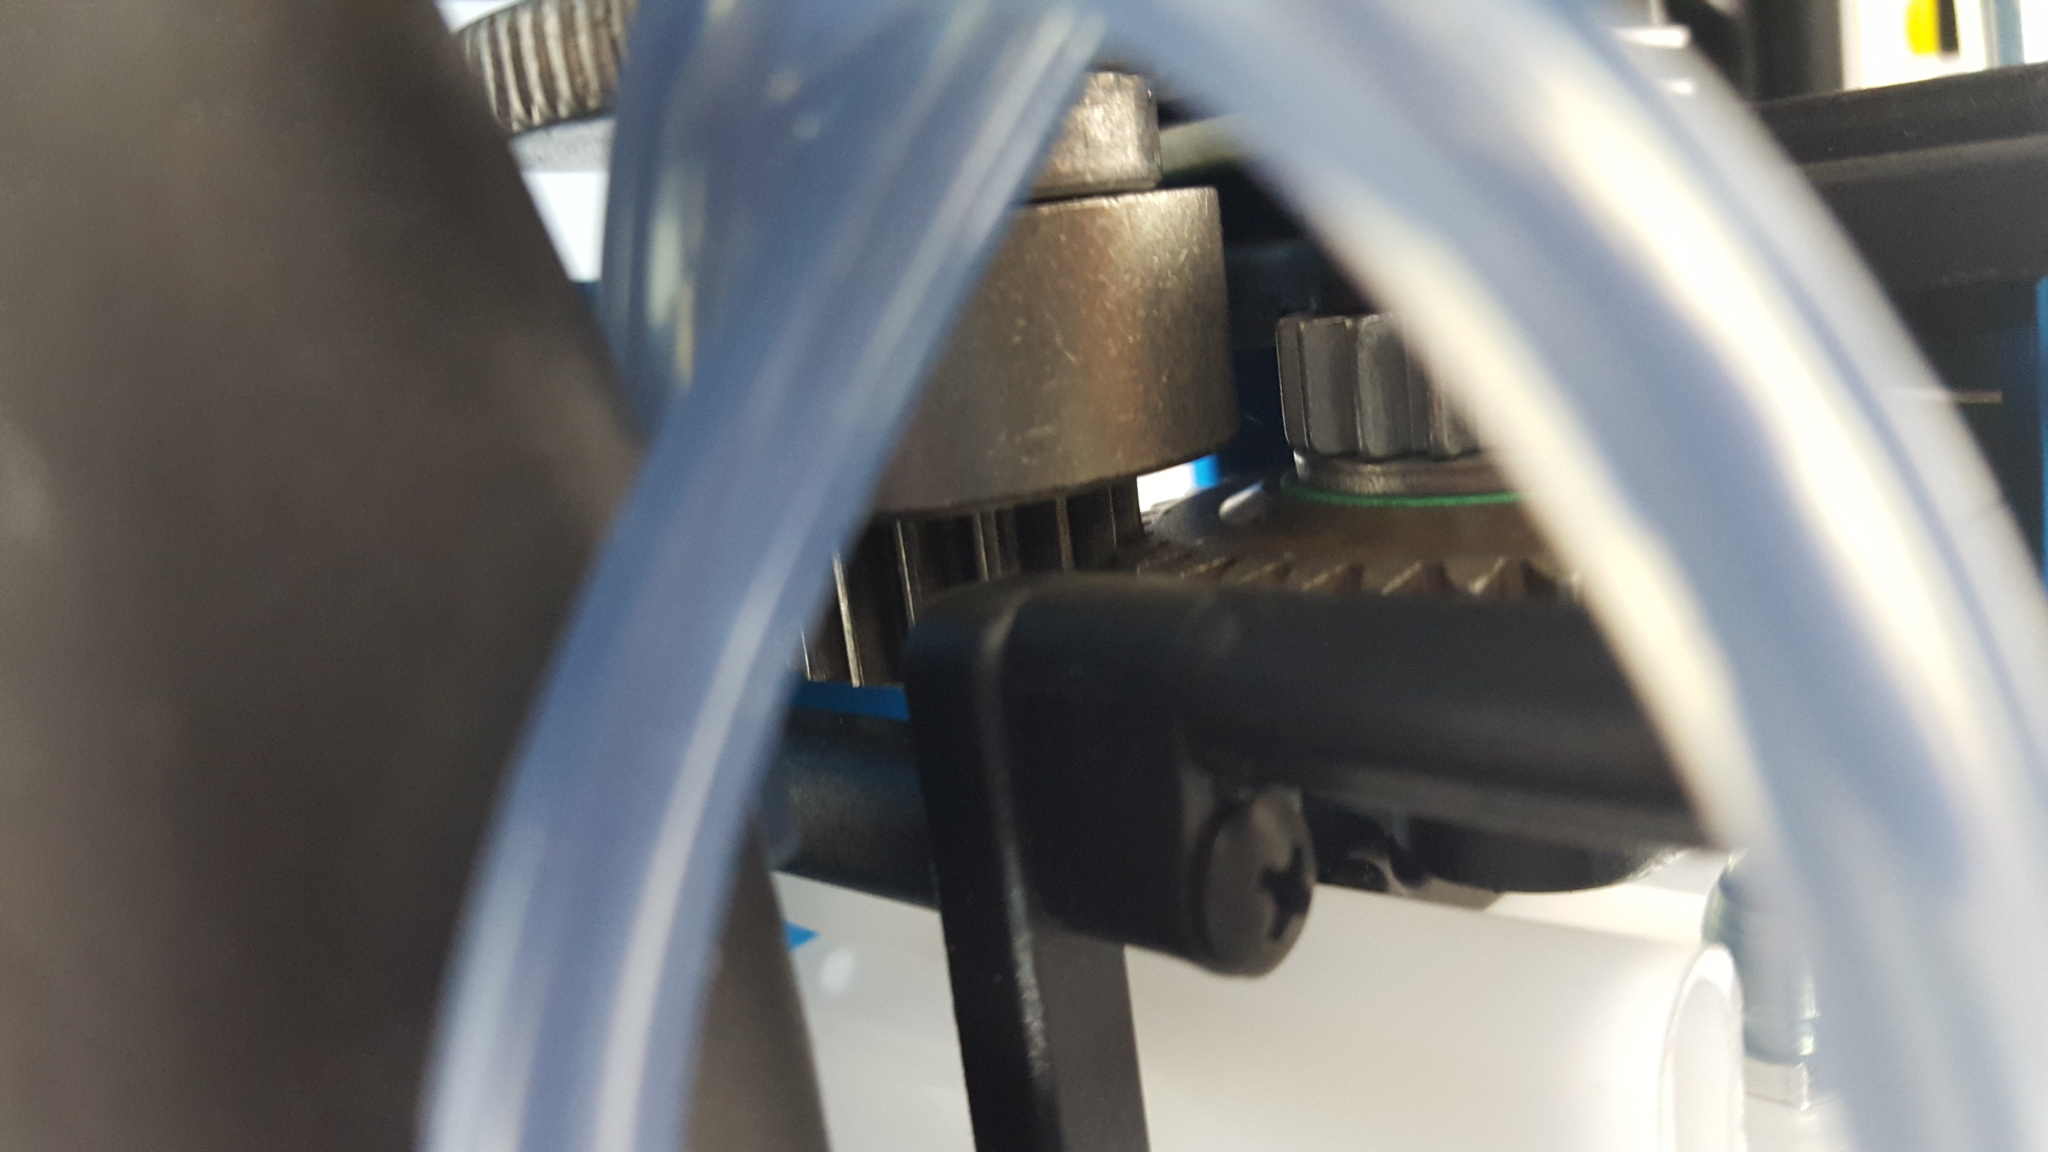
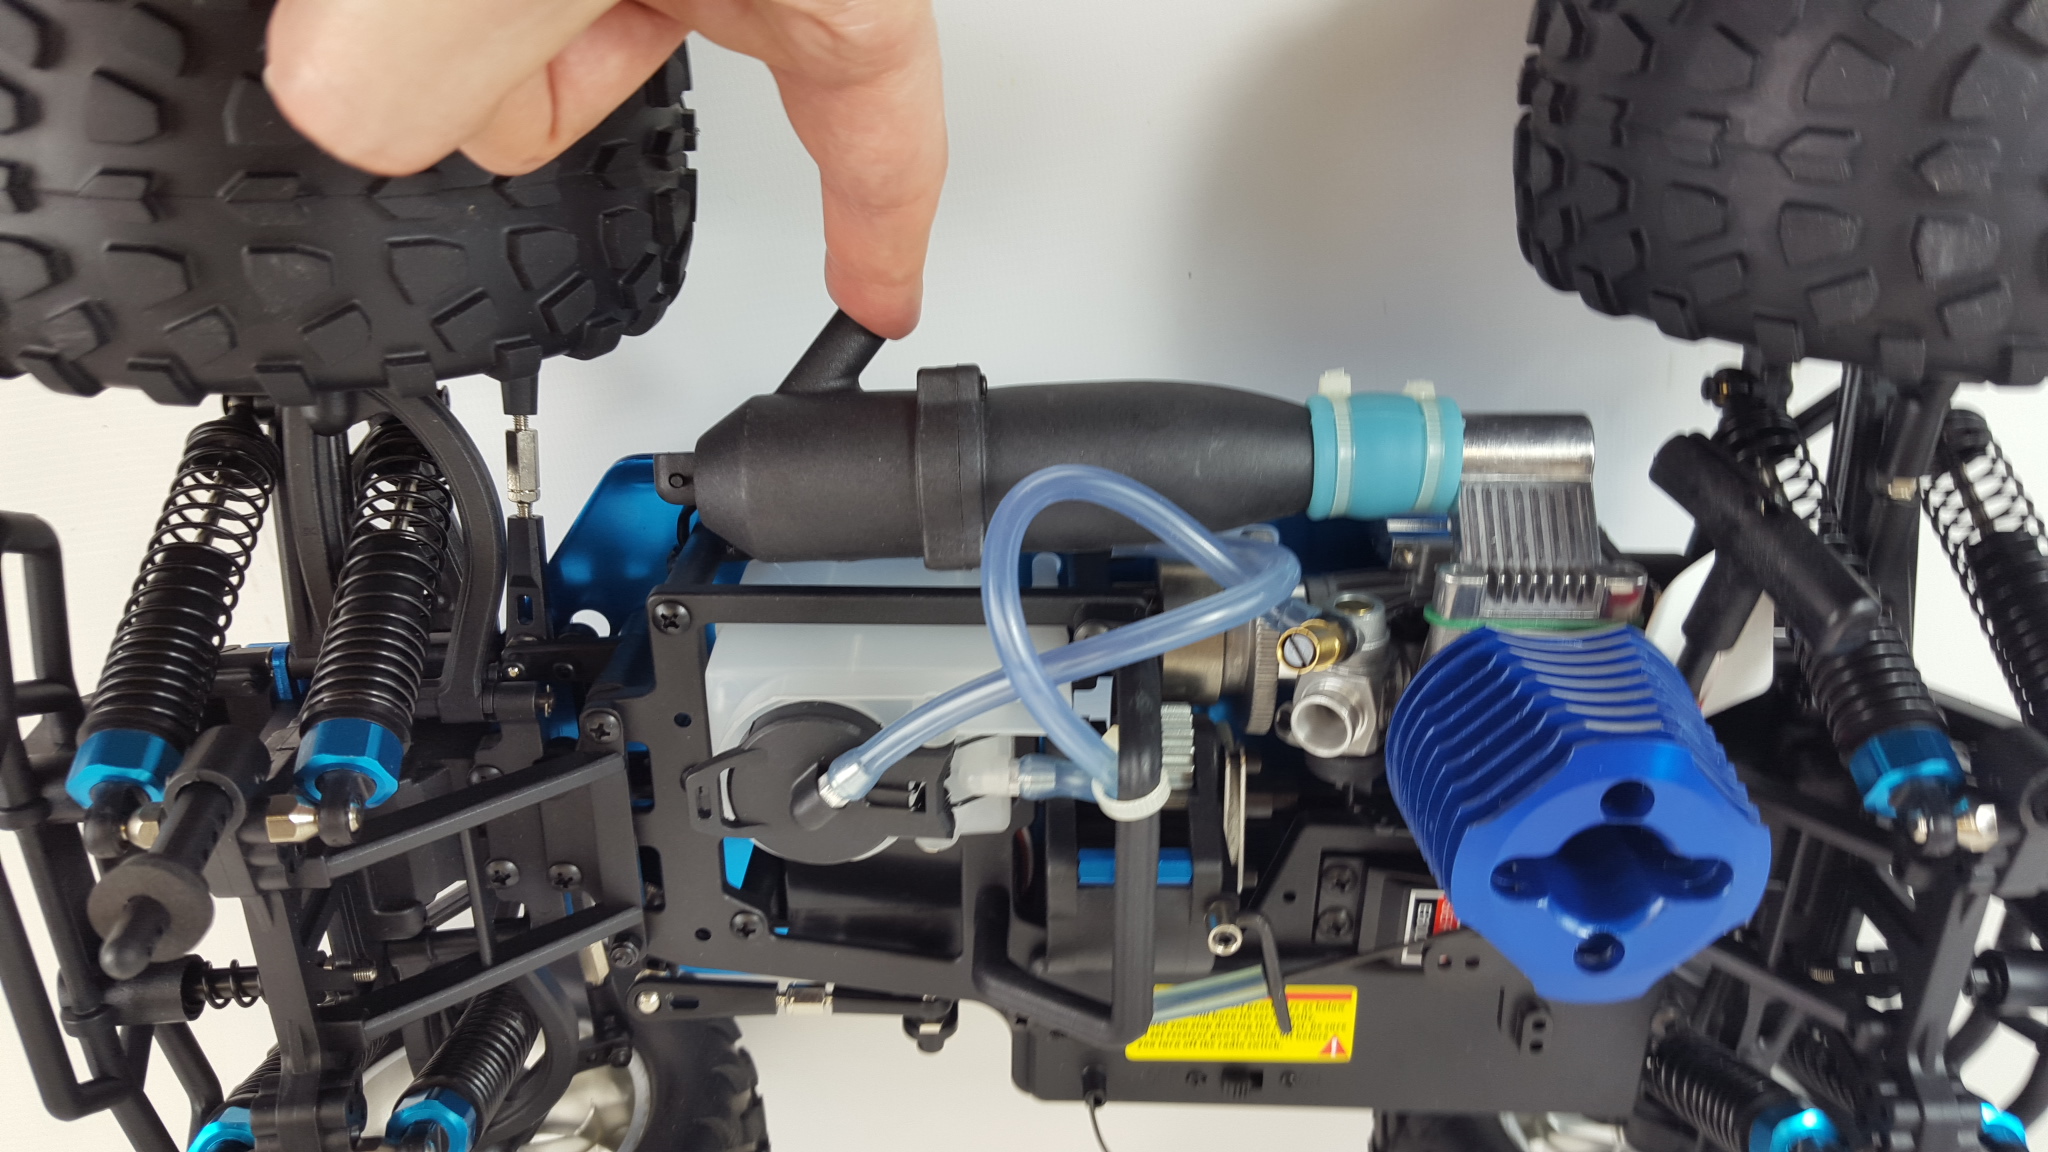
STEP 7 – Check Your Flywheel, Clutch & Gear Mesh
- Remove the glow plug in the top of your engine using your glow plug
wrench by turning it ant-clockwise. We needed to remove it in STEP 8
anyway so may as well remove it now as it makes pulling the pull start
easier. Once the glow plug is removed if you pull the pull start you
will see now it is easy to pull and the engine will just make little
popping noises.
Remove glow plug – turn anti-clockwise - Hold the flywheel (the big metal disc at the front of the engine as
shown in the picture below) still with your finger. While holding it
still try to pull the pull-start a little. You should not be able to
pull the pull start without it forcing that flywheel to also rotate. If
you can pull the pull start without it rotating the flywheel then it
means the flywheel has come loose and needs tightening. Please see other
guides on our site and other sites that explain how to tighten this.
Flywheel - Hold the clutch bell still with your fingers (the metal bell in
front of the fly-wheel). Now pull the pull start again. You should not
be able to feel anything scraping under the clutch bell. If it feels
like inside there is metal scraping against the inside of the bell then
your clutch spring may have snapped and need replacing. If no scraping
then all is ok.
Clutch Bell - This is nothing to do with the engine starting but always something
that should be checked, particularly if you have a self build model as
stripping a spur gear is probably the most common thing to go wrong on a
nitro car. On one side you have the engine with the pinion gear on the
end, and this must mesh correctly with the big spur gear on the other
side. If it is to tight so it is binding then you are going to knock the
little teeth off. And if too loose then those teeth are coming off
also. So it has to be just right. Basically as close together as
possible without actually touching. If it is a brand new model that has
not been started yet then will usually be correct already. If it is a
self build model or has been used then you need to be checking this
carefully.
Check your gear mesh
STEP 8 – Un-flood Your Engine
If this is the very first time you are starting it you don’t need to do this. If you have tried to start the model previously and the pull start has become difficult to pull, or have used it before then, with the glow plug still removed from the engine (from STEP 7), just turn the model upside down and pull the pull start 6 or 7 times. As you have the glow plug removed it should be easy to pull the pull start and you will be able to hear the engine popping and as it does that it will spit the excess fuel out of the top of the engine.
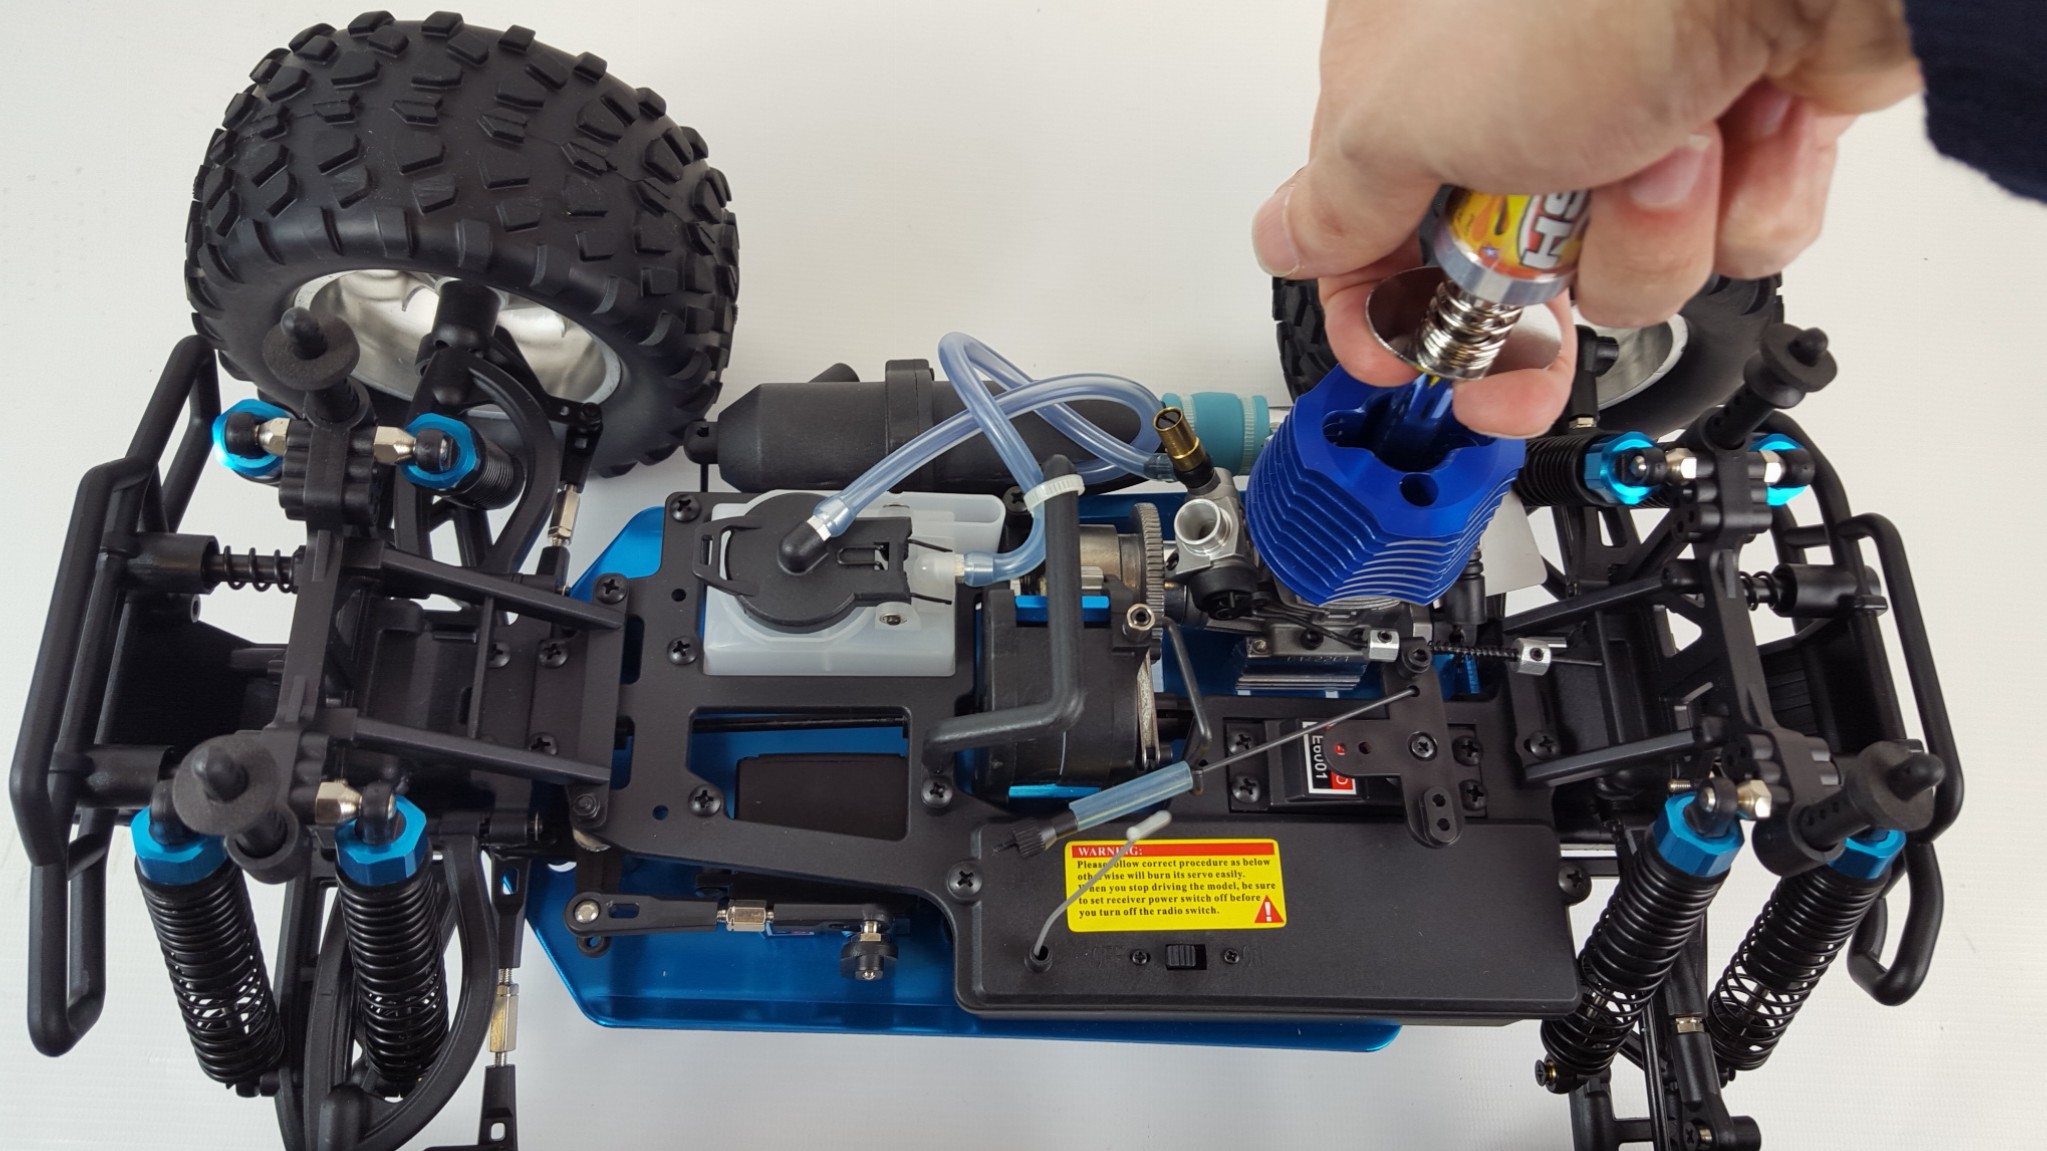
STEP 9 – Check Your Glow Start And Glow plug
Some people get confused between the glow plug and the glow start. This is your glow plug:
And this is your glow start:
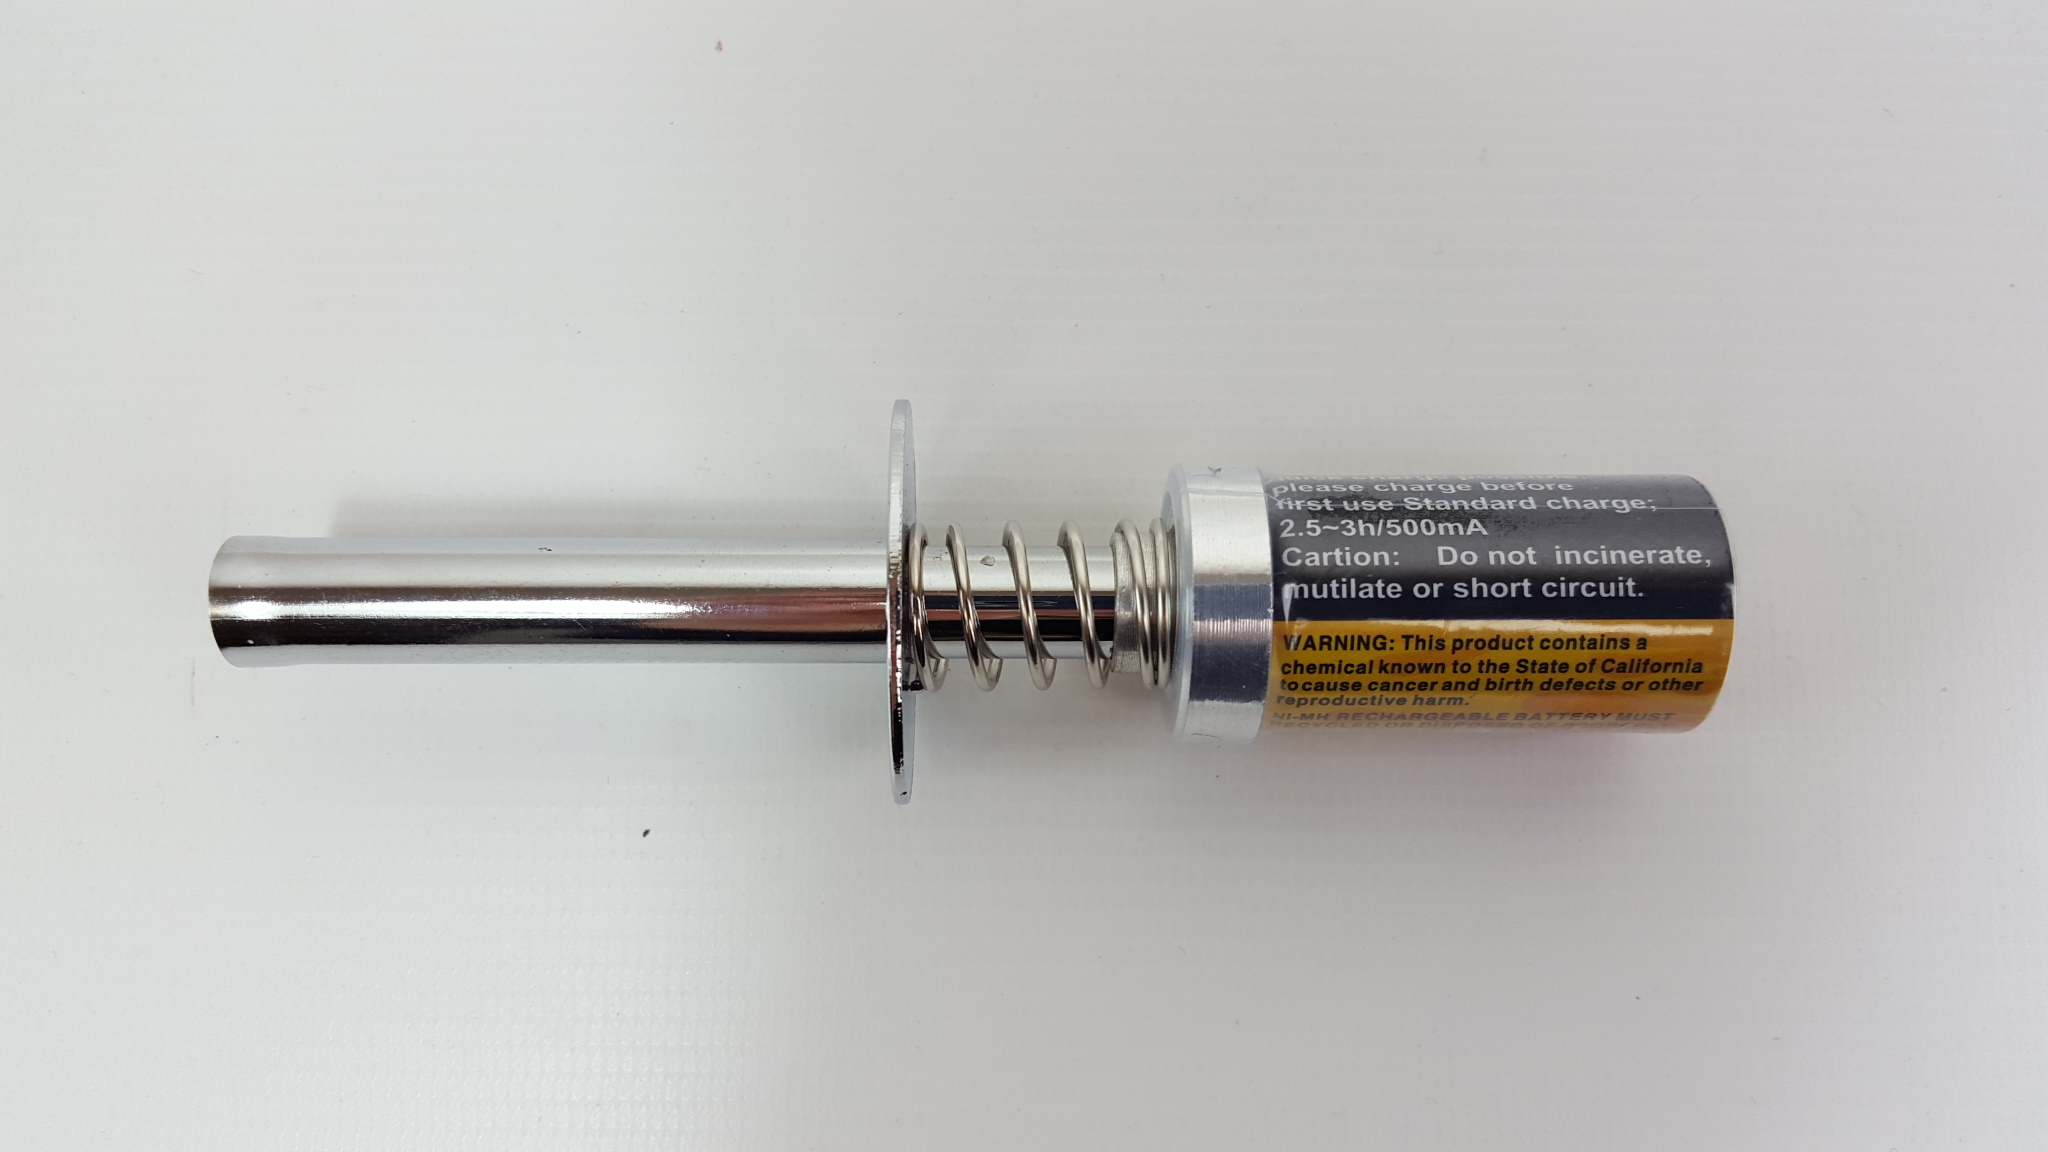
Think of the glow plug like a piece of coal and the glow start is the match. When you are starting the engine you must clip the glow start onto the glow plug to make it glow so the air and fuel inside the engine can ignite. Once the engine starts the glow start can be removed because the fire inside the engine will keep the glow plug glowing, like a lump of coal will keep glowing in a barbecue once the fire is lit.
The glow start is rechargeable. A very common thing we see is that people over-charge their glow start by charging it all night which breaks it. The charge time will usually be written on the side of the glow start and is usually 2-3 hours only. If it is brand new it may be half charged already.
One thing to keep in mind is that when the glow start is attached to
the glow plug it drains the battery quite quickly so don’t leave it on
there for a long time, only when you are actually starting the engine.
To test the glow plug and glow start just attach the glow start to the
end of the glow plug. The little coil inside should glow bright like
this:
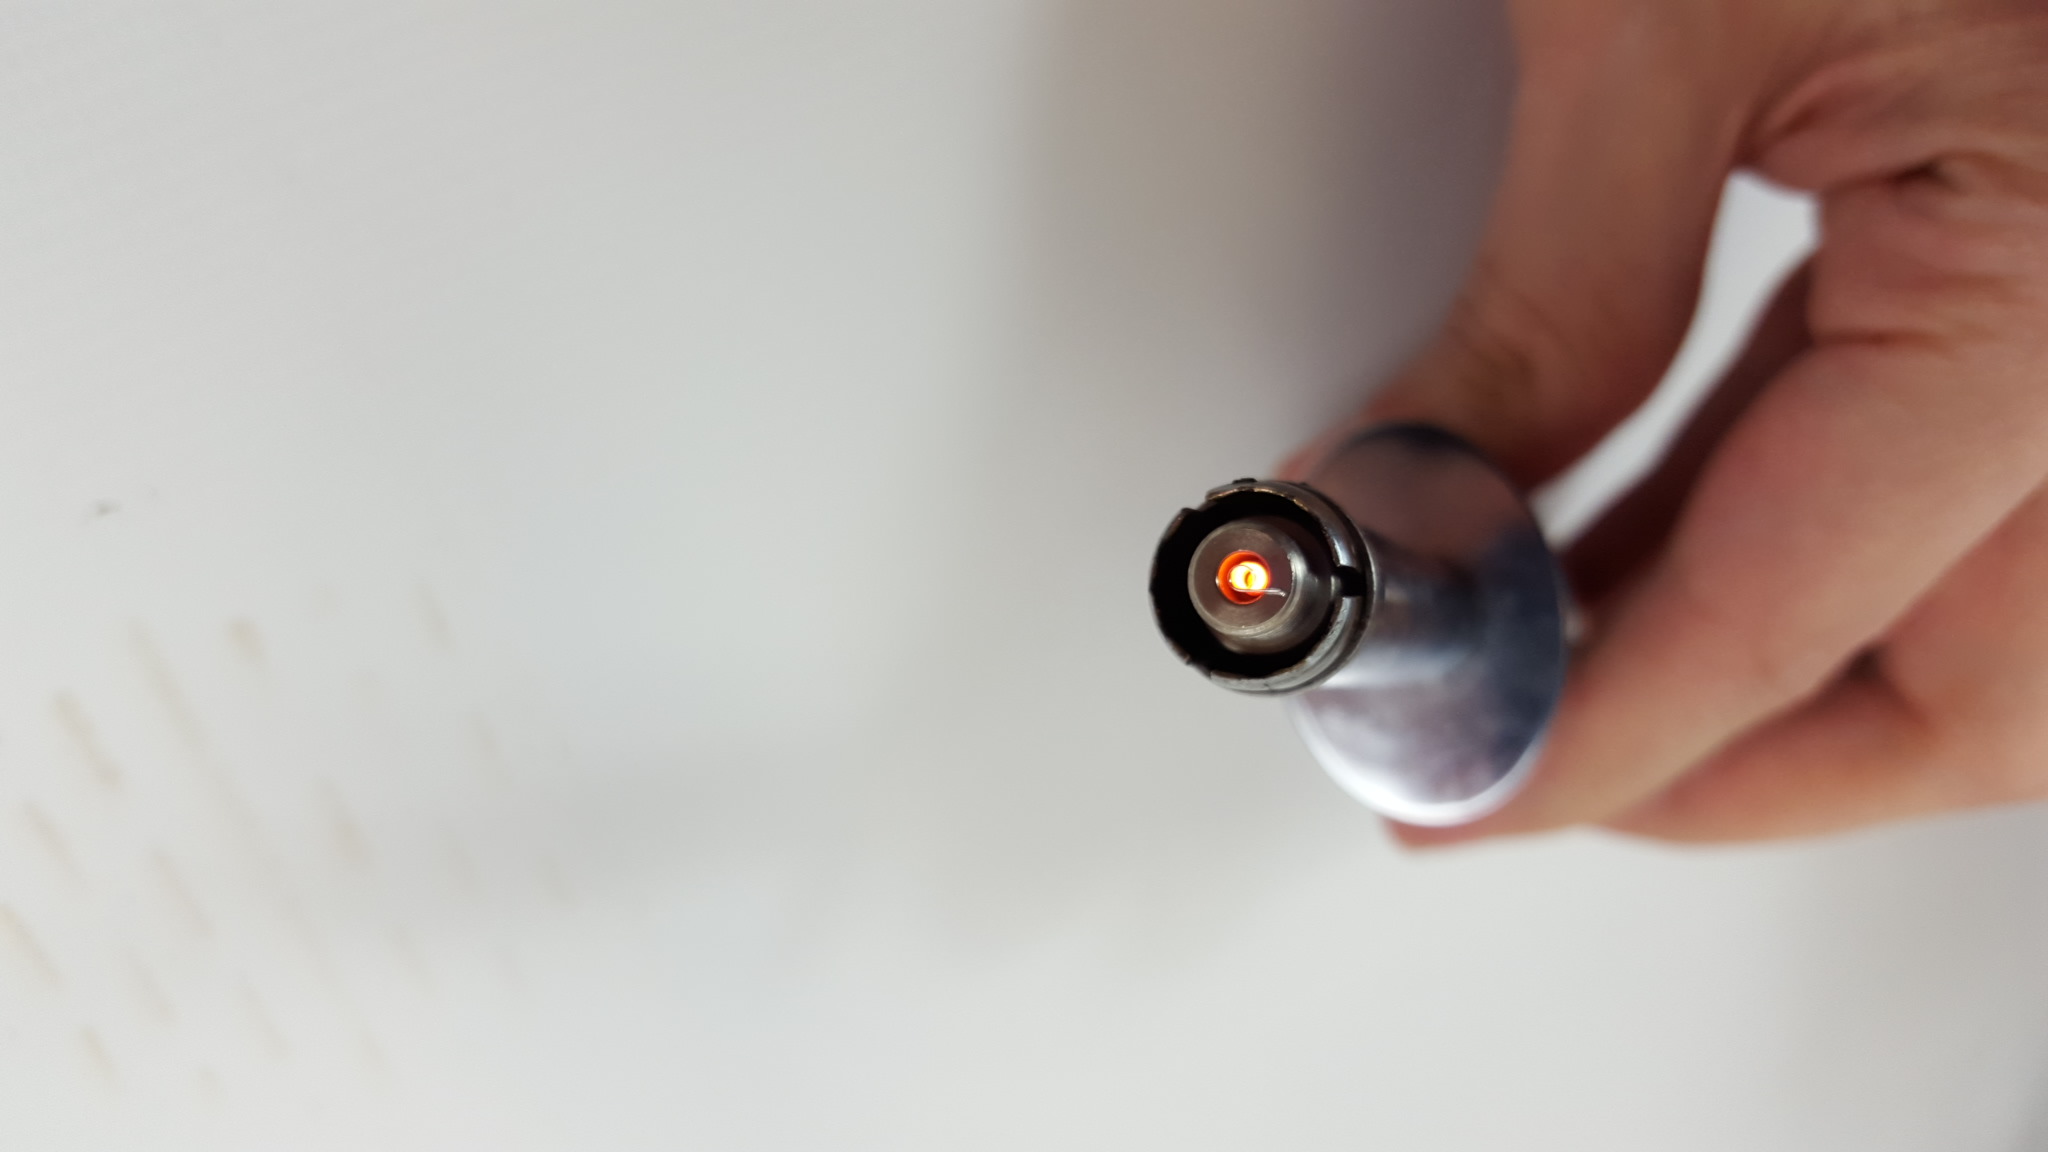
If it is not glowing brightly then it may mean your glow start is getting flat and needs charging, or the glow plug is on its way out. Glow plugs are basically the same as light bulbs with the glowing coil and like a light bulb they have a life span and are a consumable. It’s a good idea to have a couple of spare glow plugs so when your glow plug reaches the end of its life you don’t need to stop play. Running your engine with too little fuel will shorten the lifespan of the glow plug and can even break it. So if you have charged your glow start correctly and not overcharged it so you know it is ok, and your glow plug is not glowing, then it is time to replace the glow plug with a new one.
Once you have tested that the glow plug is ok use the glow plug wrench to screw it back into the top of the engine just until it has a little pinch. Not to tight or else you will thread the engine head and need to replace it, and not to loose or else you will have an air leak making starting impossible.
STEP 10 – Priming & Starting The Engine
I personally keep the radio equipment and switch on the car off while starting a new model. It means you can make small adjustments to the throttle manually by hand and don’t drain your radio batteries.
- Make sure your car is off the ground and the wheels are free to rotate. You don’t want to start it and then for it to just drive off. Once it has started never hold the model back with your hands or you will break it so for a beginner it is better to start it off the ground on a brick or stand.
- I will let you know now in advance that to turn the engine off you
have to seal the exhaust hole. I just put my finger over it but be
careful as it may be a little hot so you can use a rag or something
instead. If the engine starts it may rev highly if one setting is not
right. Some people panic and try to turn it off using the electronics
switch. That has nothing to do with the engine, it’s just for the
servos, to turn off the engine you must cover the exhaust hole.
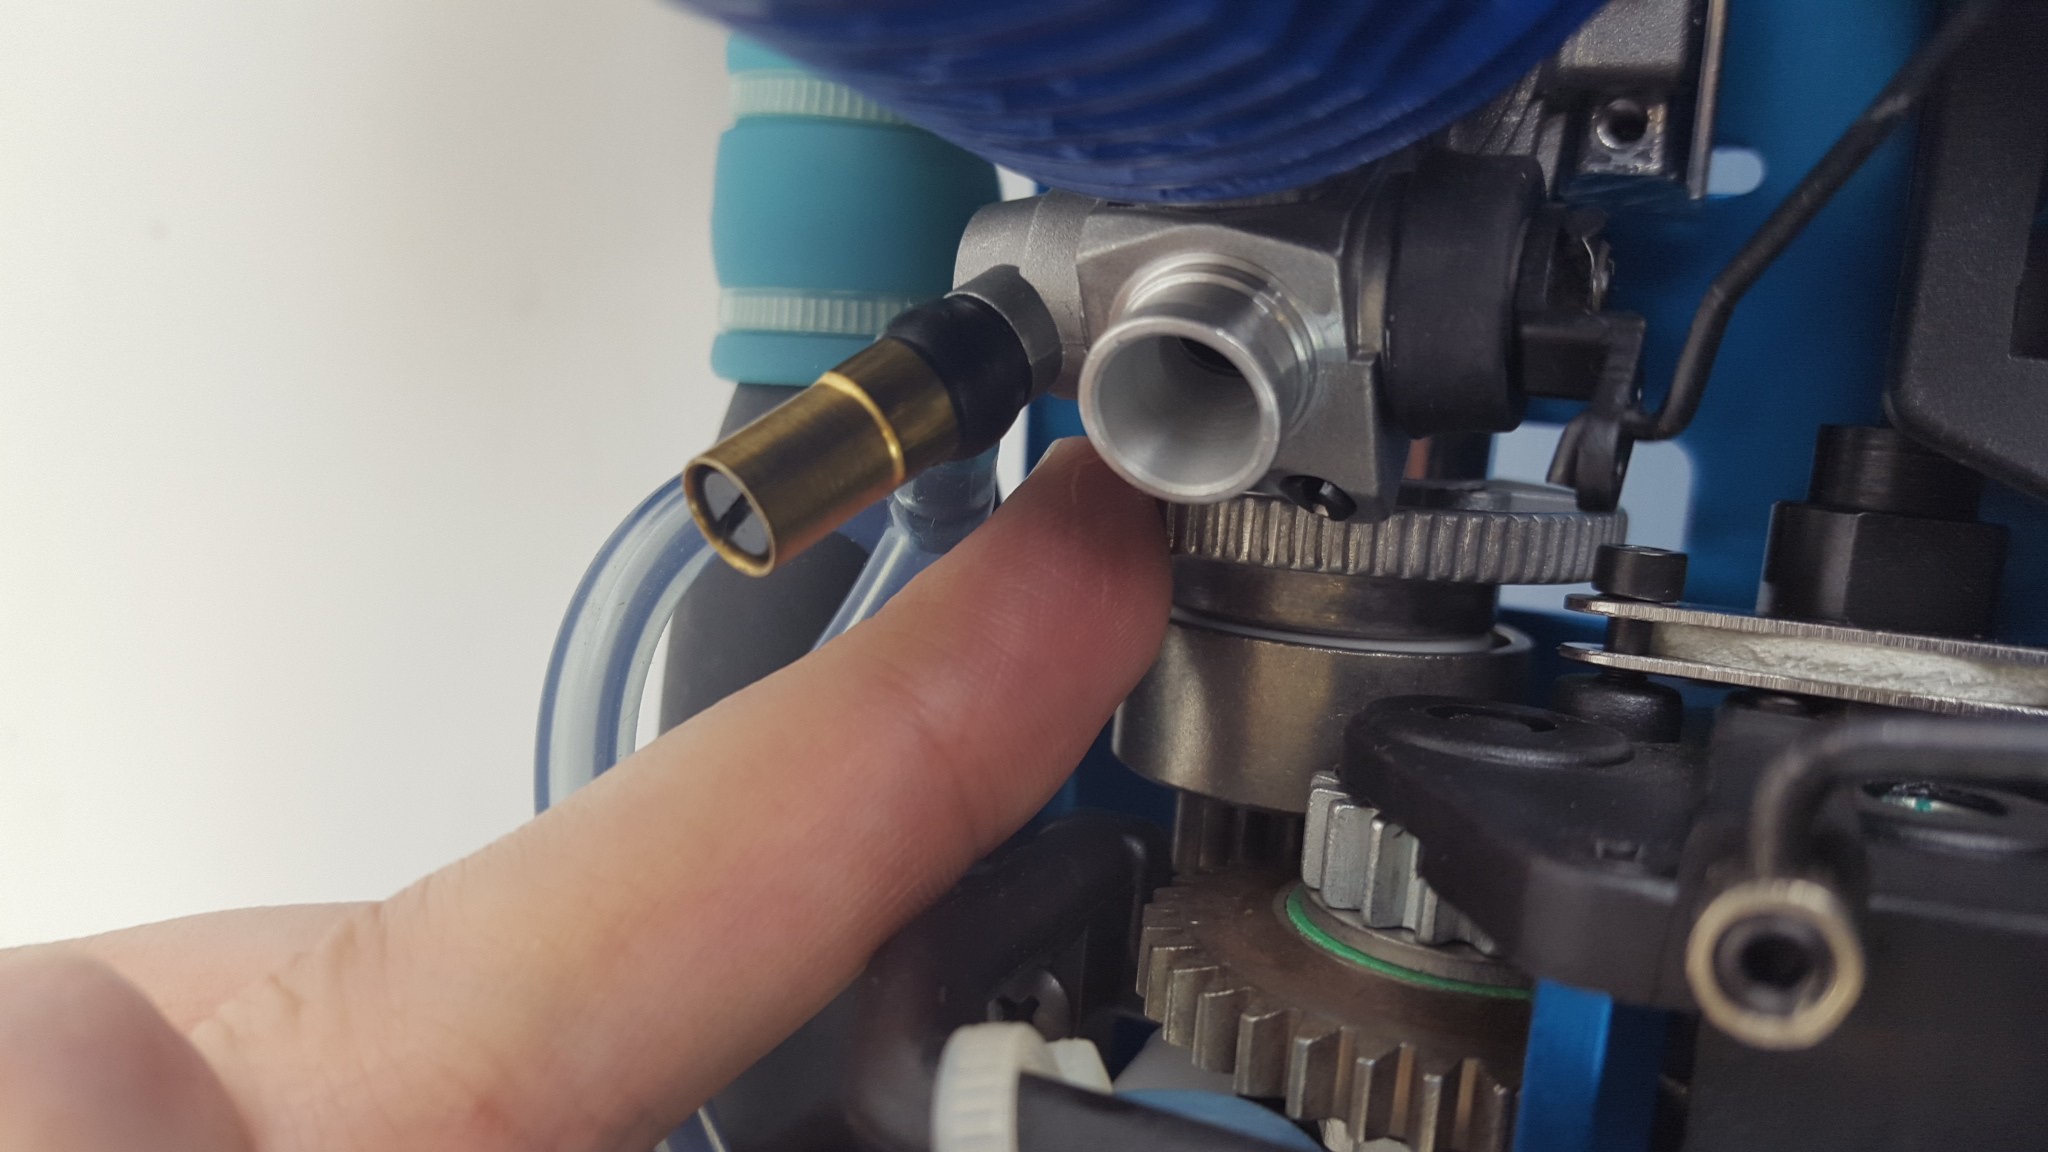
Turning the engine off - Priming the engine means getting the initial little fuel into the
engine. Put your finger over the exhaust hole and give the pull start
one pull. You should see the fuel tube going from the fuel tank to the
engine fills up with a little fuel. The fuel is clear so you need to
look carefully. You want to make the fuel fill up the fuel tube all the
way to engine and then once it touches the engine one last pull to suck
the fuel into it. It may fill up all the way on your first pull, or you
may need to pull a few times so you need to watch the fuel in the tube
carefully. If you suck up to much fuel then the engine will flood and
you will have to un-flood it and try again. If you don’t suck up enough
then there will be no fuel in the engine so it won’t start.
Once you have primed the engine take your finger off the exhaust. - Now clip the glow start onto the glow plug. It’s helpful to have
someone else hold the model down for you, of if starting on your own
push down on the glow start to hold the model down as shown:
Attach glow start to glow plug and use to hold model down. With the other hand pull the pull start with short little jabs just using your forearm, pulling the pull start about half its length out each time. Don’t do it like a lawn mower where you put your whole back into it and pull the cord all the way out, that will break the pull start. If it is not starting then probably it is not primed enough. For one of the pulls put your finger over the exhaust to suck more fuel in and then continue trying. It may also mean your throttle is to closed, try opening the air hole a tiny bit more. This is the equivalent of putting your foot on the accelerator when trying to start a cold real car just to give it a few revs to get it going. If the pull start gets stiff and the model starts jolting up when you pull it don’t continue trying. This is where fingers get sore and frustration kicks in. Instead, take a deep breath, un-flood the engine and try again. Like with everything practice makes perfect. Once you are used to priming the engine perfectly and have some experience you will be starting it so easily.
- If you have followed this guide fully and correctly then it will
soon start. I have been repairing nitro cars for around 12 years and in
this time I have never had a nitro model that would not start by
following all the above unless either someone has run the engine with so
little fuel that it has burnt all the inside. But if you have not run
it yet then that would be impossible. And the only other possibility I
have seen is a blockage in the manifold. If you have gone through all
these steps correctly and it is still not starting then remove the
exhaust manifold and make sure the opening is clear all the way through
and is not blocked. If it’s blocked clear away the blockage such as any
excess moulding. Here is a picture of the manifold part I am referring
to:
As you can see there is an opening at each end. Look inside to make sure there is nothing blocking the air flow. It’s unlikely but possible that there could be a blockage it which case just clear it. So unless you have burnt your engine or have a blockage in the manifold, then following the above correctly will work. Just remember if you have been trying for a long time your glow start may have gone flat so you need to keep testing it as explained.
- Once the engine starts unclip the glow start and one of three things
is going to happen:A – It will tick over nicely. The wheels may be
rotating a little bit but only slowly and when you put it on the floor
they will stop. This is perfect.
B – The engine will rev up and the wheels will be spinning quickly. It means one of two things. Either you have the throttle to open (see STEP 3) so adjust it so it is less open by turning the idle screw a tiny bit anti-clockwise and closing the throttle a bit more. Or you are not letting enough fuel into the engine so there is too much oxygen compared to fuel (See STEP 4). In this case turn the fuel screw quarter of a turn anti-clockwise and give it 15 seconds for the setting to take effect. But the top of the screw should never come in line with the top of the screw surround so if it does you have gone too far. Continue to fine adjust the air and fuel like this until it slows down and just ticks over.
C – The engine will start but then cut out straight away or cuts out when you unclip the glow start. It means basically you have the opposite of B above. Either you have too much fuel going into the engine or not enough air. Adjust as per B above but the opposite.
FINAL POINTS
- Turning the engine off – As above, to turn the engine off you must
cover the exhaust hole. You don’t turn the switch on the car, that’s
just for the electronics.
Turning the engine off - Running In – When you buy a brand new real car they tell you not to go over a certain number of revs when new. It’s just the same thing here to loosen up the engine. I’ve read some guides say run it through 3 or 4 tanks of fuel off the ground. I think that is overkill. You can let it tick over off the ground for a tank while you fine tune the settings such as checking how much fuel is spitting out of the exhaust and adjusting as explained in the guide. But then you can drive around slowly and just don’t give full revs for the first few tanks.
- If this is your first nitro car you may not be used to the speed. So for your first drive try to find a large open area with no curbs as beginners always seem to crash into curbs.
- As you use the model the engine will loosen up and the settings will need adjusting. The main indicator is what is coming out of the exhaust. If it is spitting fuel then turn the fuel screw a little clockwise. If not even the very odd drip then I would recommend just letting a little more fuel in to be safe. Ideally you want a nice white cloud when you accelerate. If the cloud starts to go grey then be careful as you may be burning your engine and need to let in a little more fuel.
- Maintenance – After every couple of goes just give the screws a tighten. Give it a clean. Try not to leave the engine with old fuel in it, if you are not going to be using the model for a few days it is better to run the car to empty. Keep checking your gear mesh. Some things like the glow plug, probably your spur gear and other bits are probably going to need replacing at some point. It’s just part of the hobby making these kinds of repairs.
If you have found this guide helpful please “Like” it by hitting the like button below. If you think there is something that is not so clear or wrong please get in touch so I can improve it.
Copyright Nitrotek Ltd 2015. http://www.nitrotek.co.uk
Post navigation
Previous PostNew 1:5 Scale Petrol Monster Truck Just Arrived
Nitrotek on YouTube
Nitrotek on Facebook
Nitro and electric radio controlled models: we offer a selection of petrol remote control cars and nitro powered rc car. Radio controlled model planes, jets, boats, helis and helicoptors, offering rc brushless cars and a remote control racing car selection.